使用 Flink 将 MySQL 数据写入 MatrixOne
本章节将介绍如何使用 Flink 将 MySQL 数据写入到 MatrixOne。
前期准备
本次实践需要安装部署以下软件环境:
- 完成单机部署 MatrixOne。
- 下载安装 lntelliJ IDEA(2022.2.1 or later version)。
- 根据你的系统环境选择 JDK 8+ version 版本进行下载安装。
- 下载并安装 Flink,最低支持版本为 1.11。
- 下载并安装 MySQL,推荐版本为 8.0.33。
操作步骤
步骤一:初始化项目
-
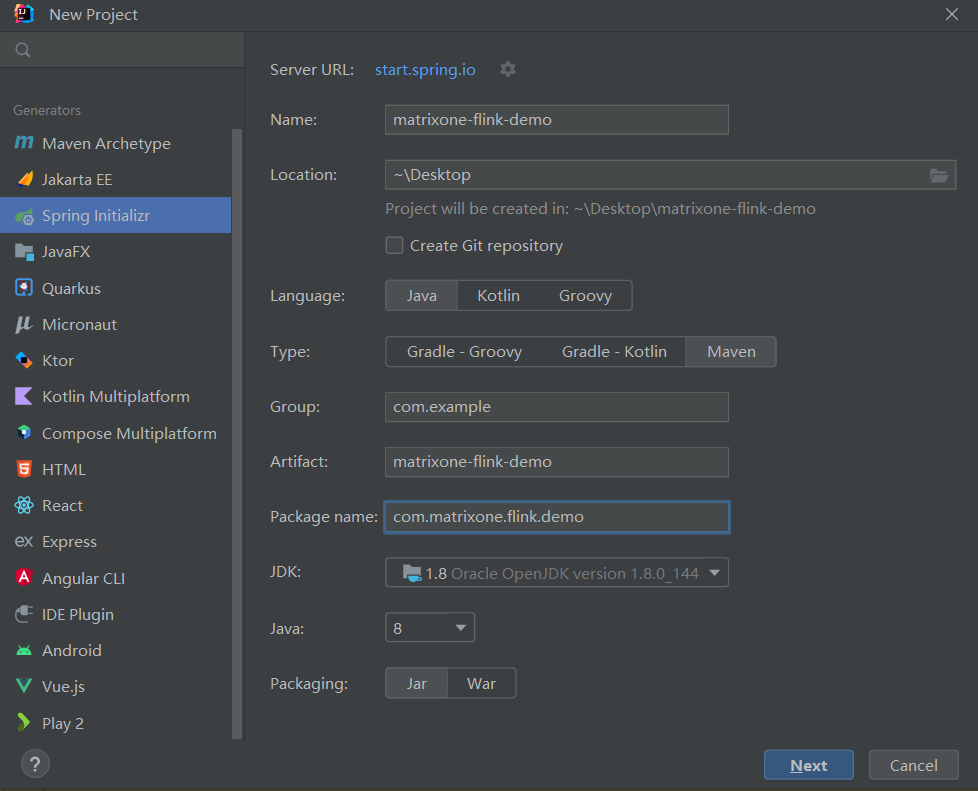
打开 IDEA,点击 File > New > Project,选择 Spring Initializer,并填写以下配置参数:
- Name:matrixone-flink-demo
- Location:~\Desktop
- Language:Java
- Type:Maven
- Group:com.example
- Artifact:matrixone-flink-demo
- Package name:com.matrixone.flink.demo
- JDK 1.8
配置示例如下图所示:

-
添加项目依赖,编辑项目根目录下的
pom.xml文件,将以下内容添加到文件中:
<?xml version="1.0" encoding="UTF-8"?>
<project xmlns="http://maven.apache.org/POM/4.0.0"
         xmlns:xsi="http://www.w3.org/2001/XMLSchema-instance"
         xsi:schemaLocation="http://maven.apache.org/POM/4.0.0 http://maven.apache.org/xsd/maven-4.0.0.xsd">
    <modelVersion>4.0.0</modelVersion>

    <groupId>com.matrixone.flink</groupId>
    <artifactId>matrixone-flink-demo</artifactId>
    <version>1.0-SNAPSHOT</version>

    <properties>
        <scala.binary.version>2.12</scala.binary.version>
        <java.version>1.8</java.version>
        <flink.version>1.17.0</flink.version>
        <scope.mode>compile</scope.mode>
    </properties>

    <dependencies>

        <!-- Flink Dependency -->
        <dependency>
            <groupId>org.apache.flink</groupId>
            <artifactId>flink-connector-hive_2.12</artifactId>
            <version>${flink.version}</version>
        </dependency>

        <dependency>
            <groupId>org.apache.flink</groupId>
            <artifactId>flink-java</artifactId>
            <version>${flink.version}</version>
        </dependency>

        <dependency>
            <groupId>org.apache.flink</groupId>
            <artifactId>flink-streaming-java</artifactId>
            <version>${flink.version}</version>
        </dependency>

        <dependency>
            <groupId>org.apache.flink</groupId>
            <artifactId>flink-clients</artifactId>
            <version>${flink.version}</version>
        </dependency>

        <dependency>
            <groupId>org.apache.flink</groupId>
            <artifactId>flink-table-api-java-bridge</artifactId>
            <version>${flink.version}</version>
        </dependency>

        <dependency>
            <groupId>org.apache.flink</groupId>
            <artifactId>flink-table-planner_2.12</artifactId>
            <version>${flink.version}</version>
        </dependency>

        <!-- JDBC相关依赖包 -->
        <dependency>
            <groupId>org.apache.flink</groupId>
            <artifactId>flink-connector-jdbc</artifactId>
            <version>1.15.4</version>
        </dependency>
        <dependency>
            <groupId>mysql</groupId>
            <artifactId>mysql-connector-java</artifactId>
            <version>8.0.33</version>
        </dependency>

        <!-- Kafka相关依赖 -->
        <dependency>
            <groupId>org.apache.kafka</groupId>
            <artifactId>kafka_2.13</artifactId>
            <version>3.5.0</version>
        </dependency>
        <dependency>
            <groupId>org.apache.flink</groupId>
            <artifactId>flink-connector-kafka</artifactId>
            <version>3.0.0-1.17</version>
        </dependency>

        <!-- JSON -->
        <dependency>
            <groupId>com.alibaba.fastjson2</groupId>
            <artifactId>fastjson2</artifactId>
            <version>2.0.34</version>
        </dependency>

    </dependencies>


    <build>
        <plugins>
            <plugin>
                <groupId>org.apache.maven.plugins</groupId>
                <artifactId>maven-compiler-plugin</artifactId>
                <version>3.8.0</version>
                <configuration>
                    <source>${java.version}</source>
                    <target>${java.version}</target>
                    <encoding>UTF-8</encoding>
                </configuration>
            </plugin>
            <plugin>
                <artifactId>maven-assembly-plugin</artifactId>
                <version>2.6</version>
                <configuration>
                    <descriptorRefs>
                        <descriptor>jar-with-dependencies</descriptor>
                    </descriptorRefs>
                </configuration>
                <executions>
                    <execution>
                        <id>make-assembly</id>
                        <phase>package</phase>
                        <goals>
                            <goal>single</goal>
                        </goals>
                    </execution>
                </executions>
            </plugin>

        </plugins>
    </build>

</project>
步骤二:读取 MatrixOne 数据
使用 MySQL 客户端连接 MatrixOne 后,创建演示所需的数据库以及数据表。
-
在 MatrixOne 中创建数据库、数据表,并导入数据:
CREATE DATABASE test; USE test; CREATE TABLE `person` (`id` INT DEFAULT NULL, `name` VARCHAR(255) DEFAULT NULL, `birthday` DATE DEFAULT NULL); INSERT INTO test.person (id, name, birthday) VALUES(1, 'zhangsan', '2023-07-09'),(2, 'lisi', '2023-07-08'),(3, 'wangwu', '2023-07-12'); -
在 IDEA 中创建
MoRead.java类,以使用 Flink 读取 MatrixOne 数据:package com.matrixone.flink.demo; import org.apache.flink.api.common.functions.MapFunction; import org.apache.flink.api.common.typeinfo.BasicTypeInfo; import org.apache.flink.api.java.ExecutionEnvironment; import org.apache.flink.api.java.operators.DataSource; import org.apache.flink.api.java.operators.MapOperator; import org.apache.flink.api.java.typeutils.RowTypeInfo; import org.apache.flink.connector.jdbc.JdbcInputFormat; import org.apache.flink.types.Row; import java.text.SimpleDateFormat; /** * @author MatrixOne * @description */ public class MoRead { private static String srcHost = "xx.xx.xx.xx"; private static Integer srcPort = 6001; private static String srcUserName = "root"; private static String srcPassword = "111"; private static String srcDataBase = "test"; public static void main(String[] args) throws Exception { ExecutionEnvironment environment = ExecutionEnvironment.getExecutionEnvironment(); // 设置并行度 environment.setParallelism(1); SimpleDateFormat sdf = new SimpleDateFormat("yyyy-MM-dd"); // 设置查询的字段类型 RowTypeInfo rowTypeInfo = new RowTypeInfo( new BasicTypeInfo[]{ BasicTypeInfo.INT_TYPE_INFO, BasicTypeInfo.STRING_TYPE_INFO, BasicTypeInfo.DATE_TYPE_INFO }, new String[]{ "id", "name", "birthday" } ); DataSource<Row> dataSource = environment.createInput(JdbcInputFormat.buildJdbcInputFormat() .setDrivername("com.mysql.cj.jdbc.Driver") .setDBUrl("jdbc:mysql://" + srcHost + ":" + srcPort + "/" + srcDataBase) .setUsername(srcUserName) .setPassword(srcPassword) .setQuery("select * from person") .setRowTypeInfo(rowTypeInfo) .finish()); // 将 Wed Jul 12 00:00:00 CST 2023 日期格式转换为 2023-07-12 MapOperator<Row, Row> mapOperator = dataSource.map((MapFunction<Row, Row>) row -> { row.setField("birthday", sdf.format(row.getField("birthday"))); return row; }); mapOperator.print(); } } -
在 IDEA 中运行
MoRead.Main(),执行结果如下:
步骤三:将 MySQL 数据写入 MatrixOne
现在可以开始使用 Flink 将 MySQL 数据迁移到 MatrixOne。
-
准备 MySQL 数据:在 node3 上,使用 Mysql 客户端连接本地 Mysql,创建所需数据库、数据表、并插入数据:
mysql -h127.0.0.1 -P3306 -uroot -proot mysql> CREATE DATABASE motest; mysql> USE motest; mysql> CREATE TABLE `person` (`id` int DEFAULT NULL, `name` varchar(255) DEFAULT NULL, `birthday` date DEFAULT NULL); mysql> INSERT INTO motest.person (id, name, birthday) VALUES(2, 'lisi', '2023-07-09'),(3, 'wangwu', '2023-07-13'),(4, 'zhaoliu', '2023-08-08'); -
清空 MatrixOne 表数据:
在 node3 上,使用 MySQL 客户端连接 node1 的 MatrixOne。由于本示例继续使用前面读取 MatrixOne 数据的示例中的
test数据库,因此我们需要首先清空person表的数据。-- 在 node3 上,使用 Mysql 客户端连接 node1 的 MatrixOne mysql -hxx.xx.xx.xx -P6001 -uroot -p111 mysql> TRUNCATE TABLE test.person; -
在 IDEA 中编写代码:
创建
Person.java和Mysql2Mo.java类,使用 Flink 读取 MySQL 数据,执行简单的 ETL 操作(将 Row 转换为 Person 对象),最终将数据写入 MatrixOne 中。
package com.matrixone.flink.demo.entity;


import java.util.Date;

public class Person {

    private int id;
    private String name;
    private Date birthday;

    public int getId() {
        return id;
    }

    public void setId(int id) {
        this.id = id;
    }

    public String getName() {
        return name;
    }

    public void setName(String name) {
        this.name = name;
    }

    public Date getBirthday() {
        return birthday;
    }

    public void setBirthday(Date birthday) {
        this.birthday = birthday;
    }
}
package com.matrixone.flink.demo;

import com.matrixone.flink.demo.entity.Person;
import org.apache.flink.api.common.functions.MapFunction;
import org.apache.flink.api.common.typeinfo.BasicTypeInfo;
import org.apache.flink.api.java.typeutils.RowTypeInfo;
import org.apache.flink.connector.jdbc.*;
import org.apache.flink.streaming.api.datastream.DataStreamSink;
import org.apache.flink.streaming.api.datastream.DataStreamSource;
import org.apache.flink.streaming.api.datastream.SingleOutputStreamOperator;
import org.apache.flink.streaming.api.environment.StreamExecutionEnvironment;
import org.apache.flink.types.Row;

import java.sql.Date;

/**
 * @author MatrixOne
 * @description
 */
public class Mysql2Mo {

    private static String srcHost = "127.0.0.1";
    private static Integer srcPort = 3306;
    private static String srcUserName = "root";
    private static String srcPassword = "root";
    private static String srcDataBase = "motest";

    private static String destHost = "xx.xx.xx.xx";
    private static Integer destPort = 6001;
    private static String destUserName = "root";
    private static String destPassword = "111";
    private static String destDataBase = "test";
    private static String destTable = "person";


    public static void main(String[] args) throws Exception {

        StreamExecutionEnvironment environment = StreamExecutionEnvironment.getExecutionEnvironment();
        //设置并行度
        environment.setParallelism(1);
        //设置查询的字段类型
        RowTypeInfo rowTypeInfo = new RowTypeInfo(
                new BasicTypeInfo[]{
                        BasicTypeInfo.INT_TYPE_INFO,
                        BasicTypeInfo.STRING_TYPE_INFO,
                        BasicTypeInfo.DATE_TYPE_INFO
                },
                new String[]{
                        "id",
                        "name",
                        "birthday"
                }
        );

        //添加 srouce
        DataStreamSource<Row> dataSource = environment.createInput(JdbcInputFormat.buildJdbcInputFormat()
                .setDrivername("com.mysql.cj.jdbc.Driver")
                .setDBUrl("jdbc:mysql://" + srcHost + ":" + srcPort + "/" + srcDataBase)
                .setUsername(srcUserName)
                .setPassword(srcPassword)
                .setQuery("select * from person")
                .setRowTypeInfo(rowTypeInfo)
                .finish());

        //进行 ETL
        SingleOutputStreamOperator<Person> mapOperator = dataSource.map((MapFunction<Row, Person>) row -> {
            Person person = new Person();
            person.setId((Integer) row.getField("id"));
            person.setName((String) row.getField("name"));
            person.setBirthday((java.util.Date)row.getField("birthday"));
            return person;
        });

        //设置 matrixone sink 信息
        mapOperator.addSink(
                JdbcSink.sink(
                        "insert into " + destTable + " values(?,?,?)",
                        (ps, t) -> {
                            ps.setInt(1, t.getId());
                            ps.setString(2, t.getName());
                            ps.setDate(3, new Date(t.getBirthday().getTime()));
                        },
                        new JdbcConnectionOptions.JdbcConnectionOptionsBuilder()
                                .withDriverName("com.mysql.cj.jdbc.Driver")
                                .withUrl("jdbc:mysql://" + destHost + ":" + destPort + "/" + destDataBase)
                                .withUsername(destUserName)
                                .withPassword(destPassword)
                                .build()
                )
        );

        environment.execute();
    }

}
步骤四:查看执行结果
在 MatrixOne 中执行如下 SQL 查询结果:
mysql> select * from test.person;
+------+---------+------------+
| id   | name    | birthday   |
+------+---------+------------+
|    2 | lisi    | 2023-07-09 |
|    3 | wangwu  | 2023-07-13 |
|    4 | zhaoliu | 2023-08-08 |
+------+---------+------------+
3 rows in set (0.01 sec)