使用 Flink 将实时数据写入 MatrixOne
概述
Apache Flink 是一个强大的框架和分布式处理引擎,专注于进行有状态计算,适用于处理无边界和有边界的数据流。Flink 能够在各种常见集群环境中高效运行,并以内存速度执行计算,支持处理任意规模的数据。
应用场景
-
事件驱动型应用
事件驱动型应用通常具备状态,并且它们从一个或多个事件流中提取数据,根据到达的事件触发计算、状态更新或执行其他外部动作。典型的事件驱动型应用包括反欺诈系统、异常检测、基于规则的报警系统和业务流程监控。
-
数据分析应用
数据分析任务的主要目标是从原始数据中提取有价值的信息和指标。Flink 支持流式和批量分析应用,适用于各种场景,例如电信网络质量监控、移动应用中的产品更新和实验评估分析、消费者技术领域的实时数据即席分析以及大规模图分析。
-
数据管道应用
提取 - 转换 - 加载(ETL)是在不同存储系统之间进行数据转换和迁移的常见方法。数据管道和 ETL 作业有相似之处,都可以进行数据转换和丰富,然后将数据从一个存储系统移动到另一个存储系统。不同之处在于数据管道以持续流模式运行,而不是周期性触发。典型的数据管道应用包括电子商务中的实时查询索引构建和持续 ETL。
本篇文档将介绍两种示例,一种是使用计算引擎 Flink 实现将实时数据写入到 MatrixOne,另一种是使用计算引擎 Flink 将流式数据写入到 MatrixOne 数据库。
前期准备
硬件环境
本次实践对于机器的硬件要求如下:
| 服务器名称 | 服务器 IP | 安装软件 | 操作系统 |
|---|---|---|---|
| node1 | 192.168.146.10 | MatrixOne | Debian11.1 x86 |
| node2 | 192.168.146.12 | kafka | Centos7.9 |
| node3 | 192.168.146.11 | IDEA、MYSQL | win10 |
软件环境
本次实践需要安装部署以下软件环境:
- 完成单机部署 MatrixOne。
- 下载安装 lntelliJ IDEA(2022.2.1 or later version)。
- 根据你的系统环境选择 JDK 8+ version 版本进行下载安装。
- 下载并安装 Kafka,推荐版本为 2.13 - 3.5.0。
- 下载并安装 Flink,推荐版本为 1.17.0。
- 下载并安装 MySQL,推荐版本为 8.0.33。
示例 1:从 MySQL 迁移数据至 MatrixOne
步骤一:初始化项目
-
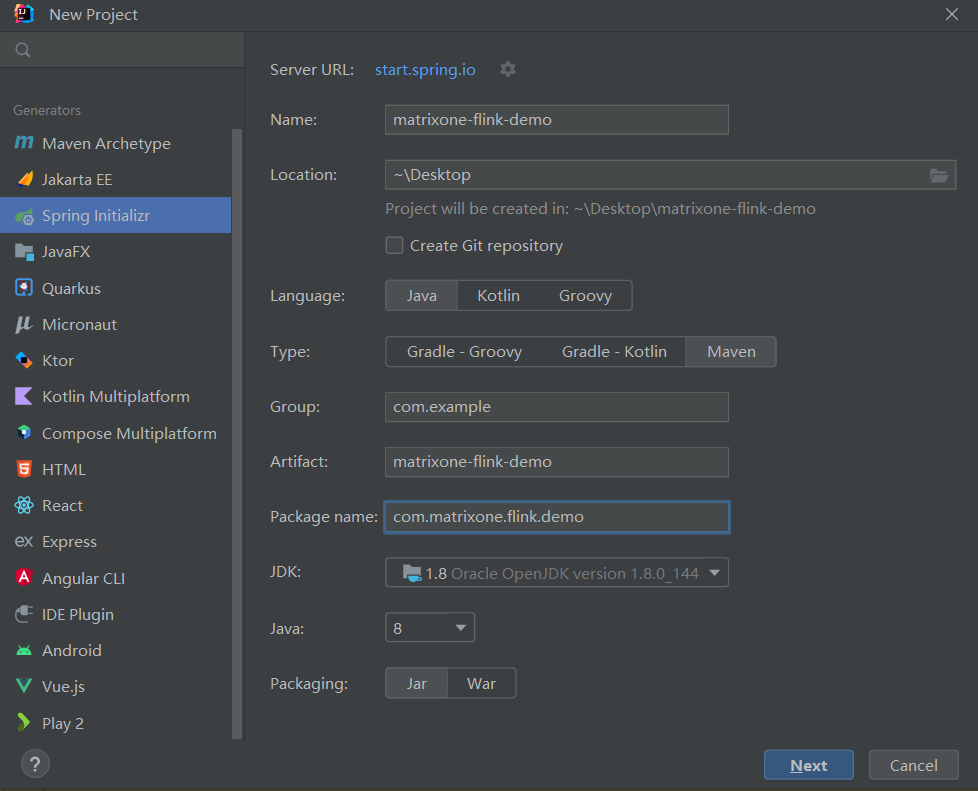
打开 IDEA,点击 File > New > Project,选择 Spring Initializer,并填写以下配置参数:
- Name:matrixone-flink-demo
- Location:~\Desktop
- Language:Java
- Type:Maven
- Group:com.example
- Artifact:matrixone-flink-demo
- Package name:com.matrixone.flink.demo
- JDK 1.8
配置示例如下图所示:
-
添加项目依赖,编辑项目根目录下的
pom.xml文件,将以下内容添加到文件中:
<?xml version="1.0" encoding="UTF-8"?>
<project xmlns="http://maven.apache.org/POM/4.0.0"
         xmlns:xsi="http://www.w3.org/2001/XMLSchema-instance"
         xsi:schemaLocation="http://maven.apache.org/POM/4.0.0 http://maven.apache.org/xsd/maven-4.0.0.xsd">
    <modelVersion>4.0.0</modelVersion>

    <groupId>com.matrixone.flink</groupId>
    <artifactId>matrixone-flink-demo</artifactId>
    <version>1.0-SNAPSHOT</version>

    <properties>
        <scala.binary.version>2.12</scala.binary.version>
        <java.version>1.8</java.version>
        <flink.version>1.17.0</flink.version>
        <scope.mode>compile</scope.mode>
    </properties>

    <dependencies>

        <!-- Flink Dependency -->
        <dependency>
            <groupId>org.apache.flink</groupId>
            <artifactId>flink-connector-hive_2.12</artifactId>
            <version>${flink.version}</version>
        </dependency>

        <dependency>
            <groupId>org.apache.flink</groupId>
            <artifactId>flink-java</artifactId>
            <version>${flink.version}</version>
        </dependency>

        <dependency>
            <groupId>org.apache.flink</groupId>
            <artifactId>flink-streaming-java</artifactId>
            <version>${flink.version}</version>
        </dependency>

        <dependency>
            <groupId>org.apache.flink</groupId>
            <artifactId>flink-clients</artifactId>
            <version>${flink.version}</version>
        </dependency>

        <dependency>
            <groupId>org.apache.flink</groupId>
            <artifactId>flink-table-api-java-bridge</artifactId>
            <version>${flink.version}</version>
        </dependency>

        <dependency>
            <groupId>org.apache.flink</groupId>
            <artifactId>flink-table-planner_2.12</artifactId>
            <version>${flink.version}</version>
        </dependency>

        <!-- JDBC相关依赖包 -->
        <dependency>
            <groupId>org.apache.flink</groupId>
            <artifactId>flink-connector-jdbc</artifactId>
            <version>1.15.4</version>
        </dependency>
        <dependency>
            <groupId>mysql</groupId>
            <artifactId>mysql-connector-java</artifactId>
            <version>8.0.33</version>
        </dependency>

        <!-- Kafka相关依赖 -->
        <dependency>
            <groupId>org.apache.kafka</groupId>
            <artifactId>kafka_2.13</artifactId>
            <version>3.5.0</version>
        </dependency>
        <dependency>
            <groupId>org.apache.flink</groupId>
            <artifactId>flink-connector-kafka</artifactId>
            <version>3.0.0-1.17</version>
        </dependency>

        <!-- JSON -->
        <dependency>
            <groupId>com.alibaba.fastjson2</groupId>
            <artifactId>fastjson2</artifactId>
            <version>2.0.34</version>
        </dependency>

    </dependencies>


    <build>
        <plugins>
            <plugin>
                <groupId>org.apache.maven.plugins</groupId>
                <artifactId>maven-compiler-plugin</artifactId>
                <version>3.8.0</version>
                <configuration>
                    <source>${java.version}</source>
                    <target>${java.version}</target>
                    <encoding>UTF-8</encoding>
                </configuration>
            </plugin>
            <plugin>
                <artifactId>maven-assembly-plugin</artifactId>
                <version>2.6</version>
                <configuration>
                    <descriptorRefs>
                        <descriptor>jar-with-dependencies</descriptor>
                    </descriptorRefs>
                </configuration>
                <executions>
                    <execution>
                        <id>make-assembly</id>
                        <phase>package</phase>
                        <goals>
                            <goal>single</goal>
                        </goals>
                    </execution>
                </executions>
            </plugin>

        </plugins>
    </build>

</project>
步骤二:读取 MatrixOne 数据
使用 MySQL 客户端连接 MatrixOne 后,创建演示所需的数据库以及数据表。
-
在 MatrixOne 中创建数据库、数据表,并导入数据:
CREATE DATABASE test; USE test; CREATE TABLE `person` (`id` INT DEFAULT NULL, `name` VARCHAR(255) DEFAULT NULL, `birthday` DATE DEFAULT NULL); INSERT INTO test.person (id, name, birthday) VALUES(1, 'zhangsan', '2023-07-09'),(2, 'lisi', '2023-07-08'),(3, 'wangwu', '2023-07-12'); -
在 IDEA 中创建
MoRead.java类,以使用 Flink 读取 MatrixOne 数据:package com.matrixone.flink.demo; import org.apache.flink.api.common.functions.MapFunction; import org.apache.flink.api.common.typeinfo.BasicTypeInfo; import org.apache.flink.api.java.ExecutionEnvironment; import org.apache.flink.api.java.operators.DataSource; import org.apache.flink.api.java.operators.MapOperator; import org.apache.flink.api.java.typeutils.RowTypeInfo; import org.apache.flink.connector.jdbc.JdbcInputFormat; import org.apache.flink.types.Row; import java.text.SimpleDateFormat; /** * @author MatrixOne * @description */ public class MoRead { private static String srcHost = "192.168.146.10"; private static Integer srcPort = 6001; private static String srcUserName = "root"; private static String srcPassword = "111"; private static String srcDataBase = "test"; public static void main(String[] args) throws Exception { ExecutionEnvironment environment = ExecutionEnvironment.getExecutionEnvironment(); // 设置并行度 environment.setParallelism(1); SimpleDateFormat sdf = new SimpleDateFormat("yyyy-MM-dd"); // 设置查询的字段类型 RowTypeInfo rowTypeInfo = new RowTypeInfo( new BasicTypeInfo[]{ BasicTypeInfo.INT_TYPE_INFO, BasicTypeInfo.STRING_TYPE_INFO, BasicTypeInfo.DATE_TYPE_INFO }, new String[]{ "id", "name", "birthday" } ); DataSource<Row> dataSource = environment.createInput(JdbcInputFormat.buildJdbcInputFormat() .setDrivername("com.mysql.cj.jdbc.Driver") .setDBUrl("jdbc:mysql://" + srcHost + ":" + srcPort + "/" + srcDataBase) .setUsername(srcUserName) .setPassword(srcPassword) .setQuery("select * from person") .setRowTypeInfo(rowTypeInfo) .finish()); // 将 Wed Jul 12 00:00:00 CST 2023 日期格式转换为 2023-07-12 MapOperator<Row, Row> mapOperator = dataSource.map((MapFunction<Row, Row>) row -> { row.setField("birthday", sdf.format(row.getField("birthday"))); return row; }); mapOperator.print(); } } -
在 IDEA 中运行
MoRead.Main(),执行结果如下:
步骤三:将 MySQL 数据写入 MatrixOne
现在可以开始使用 Flink 将 MySQL 数据迁移到 MatrixOne。
-
准备 MySQL 数据:在 node3 上,使用 Mysql 客户端连接本地 Mysql,创建所需数据库、数据表、并插入数据:
mysql -h127.0.0.1 -P3306 -uroot -proot mysql> CREATE DATABASE motest; mysql> USE motest; mysql> CREATE TABLE `person` (`id` int DEFAULT NULL, `name` varchar(255) DEFAULT NULL, `birthday` date DEFAULT NULL); mysql> INSERT INTO motest.person (id, name, birthday) VALUES(2, 'lisi', '2023-07-09'),(3, 'wangwu', '2023-07-13'),(4, 'zhaoliu', '2023-08-08'); -
清空 MatrixOne 表数据:
在 node3 上,使用 MySQL 客户端连接 node1 的 MatrixOne。由于本示例继续使用前面读取 MatrixOne 数据的示例中的
test数据库,因此我们需要首先清空person表的数据。-- 在 node3 上,使用 Mysql 客户端连接 node1 的 MatrixOne mysql -h192.168.146.10 -P6001 -uroot -p111 mysql> TRUNCATE TABLE test.person; -
在 IDEA 中编写代码:
创建
Person.java和Mysql2Mo.java类,使用 Flink 读取 MySQL 数据,执行简单的 ETL 操作(将 Row 转换为 Person 对象),最终将数据写入 MatrixOne 中。
package com.matrixone.flink.demo.entity;


import java.util.Date;

public class Person {

    private int id;
    private String name;
    private Date birthday;

    public int getId() {
        return id;
    }

    public void setId(int id) {
        this.id = id;
    }

    public String getName() {
        return name;
    }

    public void setName(String name) {
        this.name = name;
    }

    public Date getBirthday() {
        return birthday;
    }

    public void setBirthday(Date birthday) {
        this.birthday = birthday;
    }
}
package com.matrixone.flink.demo;

import com.matrixone.flink.demo.entity.Person;
import org.apache.flink.api.common.functions.MapFunction;
import org.apache.flink.api.common.typeinfo.BasicTypeInfo;
import org.apache.flink.api.java.typeutils.RowTypeInfo;
import org.apache.flink.connector.jdbc.*;
import org.apache.flink.streaming.api.datastream.DataStreamSink;
import org.apache.flink.streaming.api.datastream.DataStreamSource;
import org.apache.flink.streaming.api.datastream.SingleOutputStreamOperator;
import org.apache.flink.streaming.api.environment.StreamExecutionEnvironment;
import org.apache.flink.types.Row;

import java.sql.Date;

/**
 * @author MatrixOne
 * @description
 */
public class Mysql2Mo {

    private static String srcHost = "127.0.0.1";
    private static Integer srcPort = 3306;
    private static String srcUserName = "root";
    private static String srcPassword = "root";
    private static String srcDataBase = "motest";

    private static String destHost = "192.168.146.10";
    private static Integer destPort = 6001;
    private static String destUserName = "root";
    private static String destPassword = "111";
    private static String destDataBase = "test";
    private static String destTable = "person";


    public static void main(String[] args) throws Exception {

        StreamExecutionEnvironment environment = StreamExecutionEnvironment.getExecutionEnvironment();
        //设置并行度
        environment.setParallelism(1);
        //设置查询的字段类型
        RowTypeInfo rowTypeInfo = new RowTypeInfo(
                new BasicTypeInfo[]{
                        BasicTypeInfo.INT_TYPE_INFO,
                        BasicTypeInfo.STRING_TYPE_INFO,
                        BasicTypeInfo.DATE_TYPE_INFO
                },
                new String[]{
                        "id",
                        "name",
                        "birthday"
                }
        );

        //添加 srouce
        DataStreamSource<Row> dataSource = environment.createInput(JdbcInputFormat.buildJdbcInputFormat()
                .setDrivername("com.mysql.cj.jdbc.Driver")
                .setDBUrl("jdbc:mysql://" + srcHost + ":" + srcPort + "/" + srcDataBase)
                .setUsername(srcUserName)
                .setPassword(srcPassword)
                .setQuery("select * from person")
                .setRowTypeInfo(rowTypeInfo)
                .finish());

        //进行 ETL
        SingleOutputStreamOperator<Person> mapOperator = dataSource.map((MapFunction<Row, Person>) row -> {
            Person person = new Person();
            person.setId((Integer) row.getField("id"));
            person.setName((String) row.getField("name"));
            person.setBirthday((java.util.Date)row.getField("birthday"));
            return person;
        });

        //设置 matrixone sink 信息
        mapOperator.addSink(
                JdbcSink.sink(
                        "insert into " + destTable + " values(?,?,?)",
                        (ps, t) -> {
                            ps.setInt(1, t.getId());
                            ps.setString(2, t.getName());
                            ps.setDate(3, new Date(t.getBirthday().getTime()));
                        },
                        new JdbcConnectionOptions.JdbcConnectionOptionsBuilder()
                                .withDriverName("com.mysql.cj.jdbc.Driver")
                                .withUrl("jdbc:mysql://" + destHost + ":" + destPort + "/" + destDataBase)
                                .withUsername(destUserName)
                                .withPassword(destPassword)
                                .build()
                )
        );

        environment.execute();
    }

}
步骤四:查看执行结果
在 MatrixOne 中执行如下 SQL 查询结果:
mysql> select * from test.person;
+------+---------+------------+
| id   | name    | birthday   |
+------+---------+------------+
|    2 | lisi    | 2023-07-09 |
|    3 | wangwu  | 2023-07-13 |
|    4 | zhaoliu | 2023-08-08 |
+------+---------+------------+
3 rows in set (0.01 sec)
示例 2:将 Kafka 数据写入 MatrixOne
步骤一:启动 Kafka 服务
Kafka 集群协调和元数据管理可以通过 KRaft 或 ZooKeeper 来实现。在这里,我们将使用 Kafka 3.5.0 版本,无需依赖独立的 ZooKeeper 软件,而是使用 Kafka 自带的 KRaft 来进行元数据管理。请按照以下步骤配置配置文件,该文件位于 Kafka 软件根目录下的 config/kraft/server.properties。
配置文件内容如下:
# Licensed to the Apache Software Foundation (ASF) under one or more
# contributor license agreements.  See the NOTICE file distributed with
# this work for additional information regarding copyright ownership.
# The ASF licenses this file to You under the Apache License, Version 2.0
# (the "License"); you may not use this file except in compliance with
# the License.  You may obtain a copy of the License at
#
#    http://www.apache.org/licenses/LICENSE-2.0
#
# Unless required by applicable law or agreed to in writing, software
# distributed under the License is distributed on an "AS IS" BASIS,
# WITHOUT WARRANTIES OR CONDITIONS OF ANY KIND, either express or implied.
# See the License for the specific language governing permissions and
# limitations under the License.

#
# This configuration file is intended for use in KRaft mode, where
# Apache ZooKeeper is not present.  See config/kraft/README.md for details.
#

############################# Server Basics #############################

# The role of this server. Setting this puts us in KRaft mode
process.roles=broker,controller

# The node id associated with this instance's roles
node.id=1

# The connect string for the controller quorum
controller.quorum.voters=1@192.168.146.12:9093

############################# Socket Server Settings #############################

# The address the socket server listens on.
# Combined nodes (i.e. those with `process.roles=broker,controller`) must list the controller listener here at a minimum.
# If the broker listener is not defined, the default listener will use a host name that is equal to the value of java.net.InetAddress.getCanonicalHostName(),
# with PLAINTEXT listener name, and port 9092.
#   FORMAT:
#     listeners = listener_name://host_name:port
#   EXAMPLE:
#     listeners = PLAINTEXT://your.host.name:9092
#listeners=PLAINTEXT://:9092,CONTROLLER://:9093
listeners=PLAINTEXT://192.168.146.12:9092,CONTROLLER://192.168.146.12:9093

# Name of listener used for communication between brokers.
inter.broker.listener.name=PLAINTEXT

# Listener name, hostname and port the broker will advertise to clients.
# If not set, it uses the value for "listeners".
#advertised.listeners=PLAINTEXT://localhost:9092

# A comma-separated list of the names of the listeners used by the controller.
# If no explicit mapping set in `listener.security.protocol.map`, default will be using PLAINTEXT protocol
# This is required if running in KRaft mode.
controller.listener.names=CONTROLLER

# Maps listener names to security protocols, the default is for them to be the same. See the config documentation for more details
listener.security.protocol.map=CONTROLLER:PLAINTEXT,PLAINTEXT:PLAINTEXT,SSL:SSL,SASL_PLAINTEXT:SASL_PLAINTEXT,SASL_SSL:SASL_SSL

# The number of threads that the server uses for receiving requests from the network and sending responses to the network
num.network.threads=3

# The number of threads that the server uses for processing requests, which may include disk I/O
num.io.threads=8

# The send buffer (SO_SNDBUF) used by the socket server
socket.send.buffer.bytes=102400

# The receive buffer (SO_RCVBUF) used by the socket server
socket.receive.buffer.bytes=102400

# The maximum size of a request that the socket server will accept (protection against OOM)
socket.request.max.bytes=104857600


############################# Log Basics #############################

# A comma separated list of directories under which to store log files
log.dirs=/home/software/kafka_2.13-3.5.0/kraft-combined-logs

# The default number of log partitions per topic. More partitions allow greater
# parallelism for consumption, but this will also result in more files across
# the brokers.
num.partitions=1

# The number of threads per data directory to be used for log recovery at startup and flushing at shutdown.
# This value is recommended to be increased for installations with data dirs located in RAID array.
num.recovery.threads.per.data.dir=1

############################# Internal Topic Settings  #############################
# The replication factor for the group metadata internal topics "__consumer_offsets" and "__transaction_state"
# For anything other than development testing, a value greater than 1 is recommended to ensure availability such as 3.
offsets.topic.replication.factor=1
transaction.state.log.replication.factor=1
transaction.state.log.min.isr=1

############################# Log Flush Policy #############################

# Messages are immediately written to the filesystem but by default we only fsync() to sync
# the OS cache lazily. The following configurations control the flush of data to disk.
# There are a few important trade-offs here:
#    1. Durability: Unflushed data may be lost if you are not using replication.
#    2. Latency: Very large flush intervals may lead to latency spikes when the flush does occur as there will be a lot of data to flush.
#    3. Throughput: The flush is generally the most expensive operation, and a small flush interval may lead to excessive seeks.
# The settings below allow one to configure the flush policy to flush data after a period of time or
# every N messages (or both). This can be done globally and overridden on a per-topic basis.

# The number of messages to accept before forcing a flush of data to disk
#log.flush.interval.messages=10000

# The maximum amount of time a message can sit in a log before we force a flush
#log.flush.interval.ms=1000

############################# Log Retention Policy #############################

# The following configurations control the disposal of log segments. The policy can
# be set to delete segments after a period of time, or after a given size has accumulated.
# A segment will be deleted whenever *either* of these criteria are met. Deletion always happens
# from the end of the log.

# The minimum age of a log file to be eligible for deletion due to age
log.retention.hours=72

# A size-based retention policy for logs. Segments are pruned from the log unless the remaining
# segments drop below log.retention.bytes. Functions independently of log.retention.hours.
#log.retention.bytes=1073741824

# The maximum size of a log segment file. When this size is reached a new log segment will be created.
log.segment.bytes=1073741824

# The interval at which log segments are checked to see if they can be deleted according
# to the retention policies
log.retention.check.interval.ms=300000
文件配置完成后,执行如下命令,启动 Kafka 服务:
#生成集群ID
$ KAFKA_CLUSTER_ID="$(bin/kafka-storage.sh random-uuid)"
#设置日志目录格式
$ bin/kafka-storage.sh format -t $KAFKA_CLUSTER_ID -c config/kraft/server.properties
#启动Kafka服务
$ bin/kafka-server-start.sh config/kraft/server.properties
步骤二:创建 Kafka 主题
为了使 Flink 能够从中读取数据并写入到 MatrixOne,我们需要首先创建一个名为 "matrixone" 的 Kafka 主题。在下面的命令中,使用 --bootstrap-server 参数指定 Kafka 服务的监听地址为 192.168.146.12:9092:
$ bin/kafka-topics.sh --create --topic matrixone --bootstrap-server 192.168.146.12:9092
步骤三:读取 MatrixOne 数据
在连接到 MatrixOne 数据库之后,需要执行以下操作以创建所需的数据库和数据表:
-
在 MatrixOne 中创建数据库和数据表,并导入数据:
CREATE TABLE `users` ( `id` INT DEFAULT NULL, `name` VARCHAR(255) DEFAULT NULL, `age` INT DEFAULT NULL ) -
在 IDEA 集成开发环境中编写代码:
在 IDEA 中,创建两个类:
User.java和Kafka2Mo.java。这些类用于使用 Flink 从 Kafka 读取数据,并将数据写入 MatrixOne 数据库中。
package com.matrixone.flink.demo.entity;

public class User {

    private int id;
    private String name;
    private int age;

    public int getId() {
        return id;
    }

    public void setId(int id) {
        this.id = id;
    }

    public String getName() {
        return name;
    }

    public void setName(String name) {
        this.name = name;
    }

    public int getAge() {
        return age;
    }

    public void setAge(int age) {
        this.age = age;
    }
}
package com.matrixone.flink.demo;

import com.alibaba.fastjson2.JSON;
import com.matrixone.flink.demo.entity.User;
import org.apache.flink.api.common.eventtime.WatermarkStrategy;
import org.apache.flink.api.common.serialization.AbstractDeserializationSchema;
import org.apache.flink.connector.jdbc.JdbcExecutionOptions;
import org.apache.flink.connector.jdbc.JdbcSink;
import org.apache.flink.connector.jdbc.JdbcStatementBuilder;
import org.apache.flink.connector.jdbc.internal.options.JdbcConnectorOptions;
import org.apache.flink.connector.kafka.source.KafkaSource;
import org.apache.flink.connector.kafka.source.enumerator.initializer.OffsetsInitializer;
import org.apache.flink.streaming.api.datastream.DataStreamSource;
import org.apache.flink.streaming.api.environment.StreamExecutionEnvironment;
import org.apache.kafka.clients.consumer.OffsetResetStrategy;

import java.nio.charset.StandardCharsets;

/**
 * @author MatrixOne
 * @desc
 */
public class Kafka2Mo {

    private static String srcServer = "192.168.146.12:9092";
    private static String srcTopic = "matrixone";
    private static String consumerGroup = "matrixone_group";

    private static String destHost = "192.168.146.10";
    private static Integer destPort = 6001;
    private static String destUserName = "root";
    private static String destPassword = "111";
    private static String destDataBase = "test";
    private static String destTable = "person";

    public static void main(String[] args) throws Exception {

        //初始化环境
        StreamExecutionEnvironment env = StreamExecutionEnvironment.getExecutionEnvironment();
        //设置并行度
        env.setParallelism(1);

        //设置 kafka source 信息
        KafkaSource<User> source = KafkaSource.<User>builder()
                //Kafka 服务
                .setBootstrapServers(srcServer)
                //消息主题
                .setTopics(srcTopic)
                //消费组
                .setGroupId(consumerGroup)
                //偏移量 当没有提交偏移量则从最开始开始消费
                .setStartingOffsets(OffsetsInitializer.committedOffsets(OffsetResetStrategy.LATEST))
                //自定义解析消息内容
                .setValueOnlyDeserializer(new AbstractDeserializationSchema<User>() {
                    @Override
                    public User deserialize(byte[] message) {
                        return JSON.parseObject(new String(message, StandardCharsets.UTF_8), User.class);
                    }
                })
                .build();
        DataStreamSource<User> kafkaSource = env.fromSource(source, WatermarkStrategy.noWatermarks(), "kafka_maxtixone");
        //kafkaSource.print();

        //设置 matrixone sink 信息
        kafkaSource.addSink(JdbcSink.sink(
                "insert into users (id,name,age) values(?,?,?)",
                (JdbcStatementBuilder<User>) (preparedStatement, user) -> {
                    preparedStatement.setInt(1, user.getId());
                    preparedStatement.setString(2, user.getName());
                    preparedStatement.setInt(3, user.getAge());
                },
                JdbcExecutionOptions.builder()
                        //默认值 5000
                        .withBatchSize(1000)
                        //默认值为 0
                        .withBatchIntervalMs(200)
                        //最大尝试次数
                        .withMaxRetries(5)
                        .build(),
                JdbcConnectorOptions.builder()
                        .setDBUrl("jdbc:mysql://"+destHost+":"+destPort+"/"+destDataBase)
                        .setUsername(destUserName)
                        .setPassword(destPassword)
                        .setDriverName("com.mysql.cj.jdbc.Driver")
                        .setTableName(destTable)
                        .build()
        ));
        env.execute();
    }
}
代码编写完成后,你可以运行 Flink 任务,即在 IDEA 中选择 Kafka2Mo.java 文件,然后执行 Kafka2Mo.Main()。
步骤四:生成数据
使用 Kafka 提供的命令行生产者工具,您可以向 Kafka 的 "matrixone" 主题中添加数据。在下面的命令中,使用 --topic 参数指定要添加到的主题,而 --bootstrap-server 参数指定了 Kafka 服务的监听地址。
bin/kafka-console-producer.sh --topic matrixone --bootstrap-server 192.168.146.12:9092
执行上述命令后,您将在控制台上等待输入消息内容。只需直接输入消息值 (value),每行表示一条消息(以换行符分隔),如下所示:
{"id": 10, "name": "xiaowang", "age": 22}
{"id": 20, "name": "xiaozhang", "age": 24}
{"id": 30, "name": "xiaogao", "age": 18}
{"id": 40, "name": "xiaowu", "age": 20}
{"id": 50, "name": "xiaoli", "age": 42}

步骤五:查看执行结果
在 MatrixOne 中执行如下 SQL 查询结果:
mysql> select * from test.users;
+------+-----------+------+
| id   | name      | age  |
+------+-----------+------+
|   10 | xiaowang  |   22 |
|   20 | xiaozhang |   24 |
|   30 | xiaogao   |   18 |
|   40 | xiaowu    |   20 |
|   50 | xiaoli    |   42 |
+------+-----------+------+
5 rows in set (0.01 sec)