

Import Hive data into MatrixOne using Spark
In this chapter, we will cover the implementation of Hive bulk data writing to MatrixOne using the Spark calculation engine.
Pre-preparation
This practice requires the installation and deployment of the following software environments:
Finished installing and starting MatrixOne.
Download and install IntelliJ IDEA version 2022.2.1 and above.
Download and install JDK 8+.
Importing data from Hive requires installing Hadoop and Hive.
Download and install MySQL Client 8.0.33.
Operational steps
Step one: Initialize the project
Launch IDEA, click File > New > Project, select Spring Initializer, and fill in the following configuration parameters:
Name:mo-spark-demo
Location:~\Desktop
Language:Java
Type:Maven
Group:com.example
Artiface:matrixone-spark-demo
Package name:com.matrixone.demo
JDK 1.8

Add a project dependency and edit the contents of
pom.xmlin the project root as follows:
<?xml version="1.0" encoding="UTF-8"?>
<project xmlns="http://maven.apache.org/POM/4.0.0"
         xmlns:xsi="http://www.w3.org/2001/XMLSchema-instance"
         xsi:schemaLocation="http://maven.apache.org/POM/4.0.0 http://maven.apache.org/xsd/maven-4.0.0.xsd">
    <modelVersion>4.0.0</modelVersion>

    <groupId>com.example.mo</groupId>
    <artifactId>mo-spark-demo</artifactId>
    <version>1.0-SNAPSHOT</version>

    <properties>
        <maven.compiler.source>8</maven.compiler.source>
        <maven.compiler.target>8</maven.compiler.target>
        <spark.version>3.2.1</spark.version>
    </properties>

    <dependencies>
        <dependency>
            <groupId>org.apache.spark</groupId>
            <artifactId>spark-sql_2.12</artifactId>
            <version>${spark.version}</version>
        </dependency>

        <dependency>
            <groupId>org.apache.spark</groupId>
            <artifactId>spark-hive_2.12</artifactId>
            <version>${spark.version}</version>
        </dependency>
        <dependency>
            <groupId>org.apache.spark</groupId>
            <artifactId>spark-catalyst_2.12</artifactId>
            <version>${spark.version}</version>
        </dependency>
        <dependency>
            <groupId>org.apache.spark</groupId>
            <artifactId>spark-core_2.12</artifactId>
            <version>${spark.version}</version>
        </dependency>
        <dependency>
            <groupId>org.codehaus.jackson</groupId>
            <artifactId>jackson-core-asl</artifactId>
            <version>1.9.13</version>
        </dependency>
        <dependency>
            <groupId>org.codehaus.jackson</groupId>
            <artifactId>jackson-mapper-asl</artifactId>
            <version>1.9.13</version>
        </dependency>


        <dependency>
            <groupId>mysql</groupId>
            <artifactId>mysql-connector-java</artifactId>
            <version>8.0.16</version>
        </dependency>

    </dependencies>

</project>
Step Two: Prepare Hive Data
Create a Hive database, data table, and insert data by executing the following command in a terminal window:
hive
hive> create database motest;
hive> CREATE TABLE `users`(
  `id` int,
  `name` varchar(255),
  `age` int);
hive> INSERT INTO motest.users (id, name, age) VALUES(1, 'zhangsan', 12),(2, 'lisi', 17),(3, 'wangwu', 19);
Step Three: Create a MatrixOne data table
On node3, connect to node1’s MatrixOne using a MySQL client. Then continue with the “test” database you created earlier and create a new data table “users”.
CREATE TABLE `users` (
`id` INT DEFAULT NULL,
`name` VARCHAR(255) DEFAULT NULL,
`age` INT DEFAULT NULL
)
Step four: Copy the configuration file
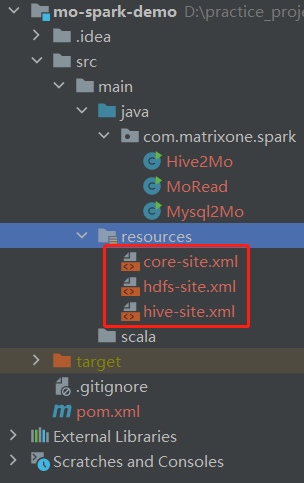
Copy the three configuration files “etc/hadoop/core-site.xml” and “hdfs-site.xml” in the Hadoop root and “conf/hive-site.xml” in the Hive root to the “resource” directory of your project.
Step five: Write the code
Create a class called “Hive2Mo.java” in IntelliJ IDEA to use Spark to read data from Hive and write data to MatrixOne.
package com.matrixone.spark;

import org.apache.spark.sql.*;

import java.sql.SQLException;
import java.util.Properties;

/**
 * @auther MatrixOne
 * @date 2022/2/9 10:02
 * @desc
 *
 * 1.在 hive 和 matrixone 中分别创建相应的表
 * 2.将 core-site.xml hdfs-site.xml 和 hive-site.xml 拷贝到 resources 目录下
 * 3.需要设置域名映射
 */
public class Hive2Mo {

    // parameters
    private static String master = "local[2]";
    private static String appName = "app_spark_demo";

    private static String destHost = "xx.xx.xx.xx";
    private static Integer destPort = 6001;
    private static String destUserName = "root";
    private static String destPassword = "111";
    private static String destDataBase = "test";
    private static String destTable = "users";


    public static void main(String[] args) throws SQLException {
        SparkSession sparkSession = SparkSession.builder()
                .appName(appName)
                .master(master)
                .enableHiveSupport()
                .getOrCreate();

        //SparkJdbc to read table contents
        System.out.println("Read table contents of person in hive");
        // Read all data in the table
        Dataset<Row> rowDataset = sparkSession.sql("select * from motest.users");
        // Show data
        //rowDataset.show();
        Properties properties = new Properties();
        properties.put("user", destUserName);
        properties.put("password", destPassword);;
        rowDataset.write()
                .mode(SaveMode.Append)
                .jdbc("jdbc:mysql://" + destHost + ":" + destPort + "/" + destDataBase,destTable, properties);
    }

}
Step Six: View Implementation Results
Execute the following SQL in MatrixOne to view the execution results:
mysql> select * from test.users;
+------+----------+------+
| id   | name     | age  |
+------+----------+------+
|    1 | zhangsan |   12 |
|    2 | lisi     |   17 |
|    3 | wangwu   |   19 |
+------+----------+------+
3 rows in set (0.00 sec)