

Draft and submit GitHub issues with an agent
MOI agents can connect to your GitHub account, organize problem descriptions from a conversation into structured issues, and submit them directly to a specified repository after your confirmation. By restricting the agent’s target repository and defining its operating rules, you can turn scattered feedback into trackable development tasks while reducing manual copying and editing.
This tutorial shows how to connect your GitHub account in a conversation, create a dedicated agent, and turn a real problem report into an issue. Replace YOUR_GITHUB_USERNAME/your-repository with a repository where you have permission to create issues. You can also fork a public repository first. A private repository is also suitable if the token explicitly includes it and Issues are enabled.
What you will accomplish
Connect your GitHub account in a conversation and select a repository you can access.
Create a GitHub issue submission assistant using natural language.
Have the agent draft an issue first and submit it only after confirmation.
Verify the created issue through the returned link.
Before you begin
Have an MOI account. You can sign in or sign up for MOI.
Prepare a GitHub account.
Prepare a real problem related to the target repository, such as incorrect page content, missing steps, a broken link, or unclear wording.
Set the MOI interface to English before following the steps. Account and repository identifiers in the screenshots are covered for privacy; use your own values when following the tutorial.
Warning
This tutorial creates a real issue in your selected repository. Submit only real, verifiable problem reports. If you are only trying out the workflow, stop after generating a draft; do not submit sample content or duplicate issues. Do not include passwords, secrets, customer information, or other sensitive content in the conversation or issue body.
Steps
1. Connect GitHub in a conversation
Sign in to MOI, enter the workspace where you want to create the agent, and start a new conversation.
Send the following message in the input box:
I want to create an agent that drafts and submits GitHub issues.
Please help me connect my GitHub account first. Do not create the agent or submit any issues yet.
If creating the GitHub tool instance requires a token, first create a fine-grained personal access token in GitHub:
Open Create a fine-grained personal access token on GitHub. Sign in to GitHub if prompted. You can also navigate through Profile picture > Settings > Developer settings > Personal access tokens > Fine-grained tokens > Generate new token.
Enter a token name and expiration date. For this walkthrough, use a repository owned by your account and select your account as Resource owner. Under Repository access, select Only select repositories, then select
YOUR_GITHUB_USERNAME/your-repository.Under Permissions, click Add permissions, add Issues, and set its access to Read and write. Keep the required Metadata permission at Read-only.
Click Generate token, immediately copy the generated token, and paste it into the GitHub tool instance configuration in MOI. The token is displayed only once after creation. Store it securely and do not send it in the conversation or issue body.
After saving, reopen the token details and verify that Repository access lists the intended repository and Repository permissions lists Issues read/write and Metadata read-only. Selecting values in the creation form is not enough if they were not saved.
The following example shows the configuration: select a repository you can access, set
Issuesto Read and write, and keepMetadataset to Read-only.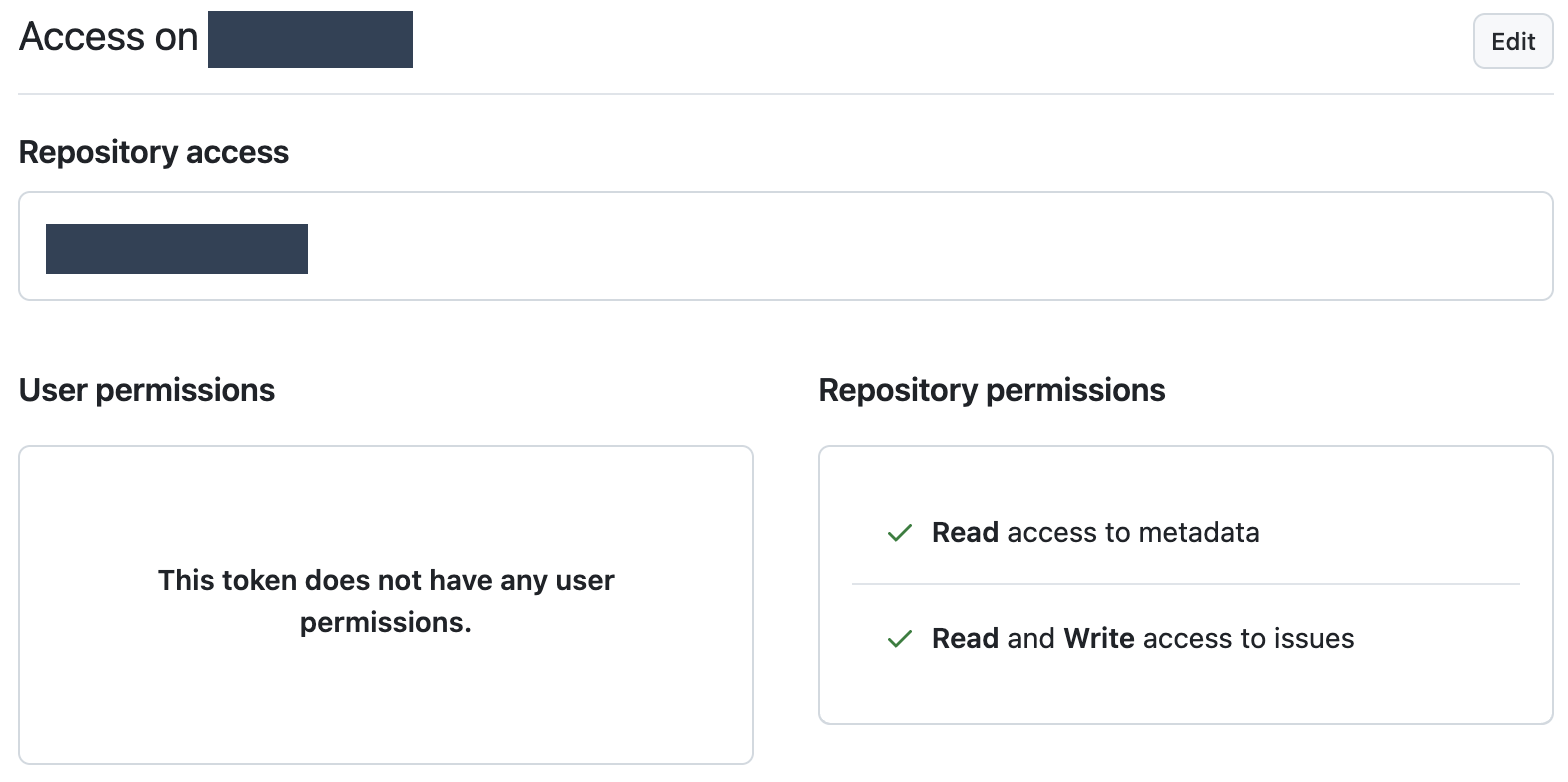
The conversation asks you to select a GitHub tool instance. If none is available, click Create Tool Instance and fill in:
Field
Value
Tool Instance Name
GitHub TutorialOwner
Your GitHub username, such as
YOUR_GITHUB_USERNAMERepository
The repository name only, such as
your-repositoryAccess Token
The token you just generated
App ID, Installation ID, Webhook Secret
Leave blank for this token-based walkthrough
Connection timeout
Leave blank to use the default
Click Save, select the saved instance, and click Continue. The Owner is the GitHub repository owner, not your MOI workspace name.
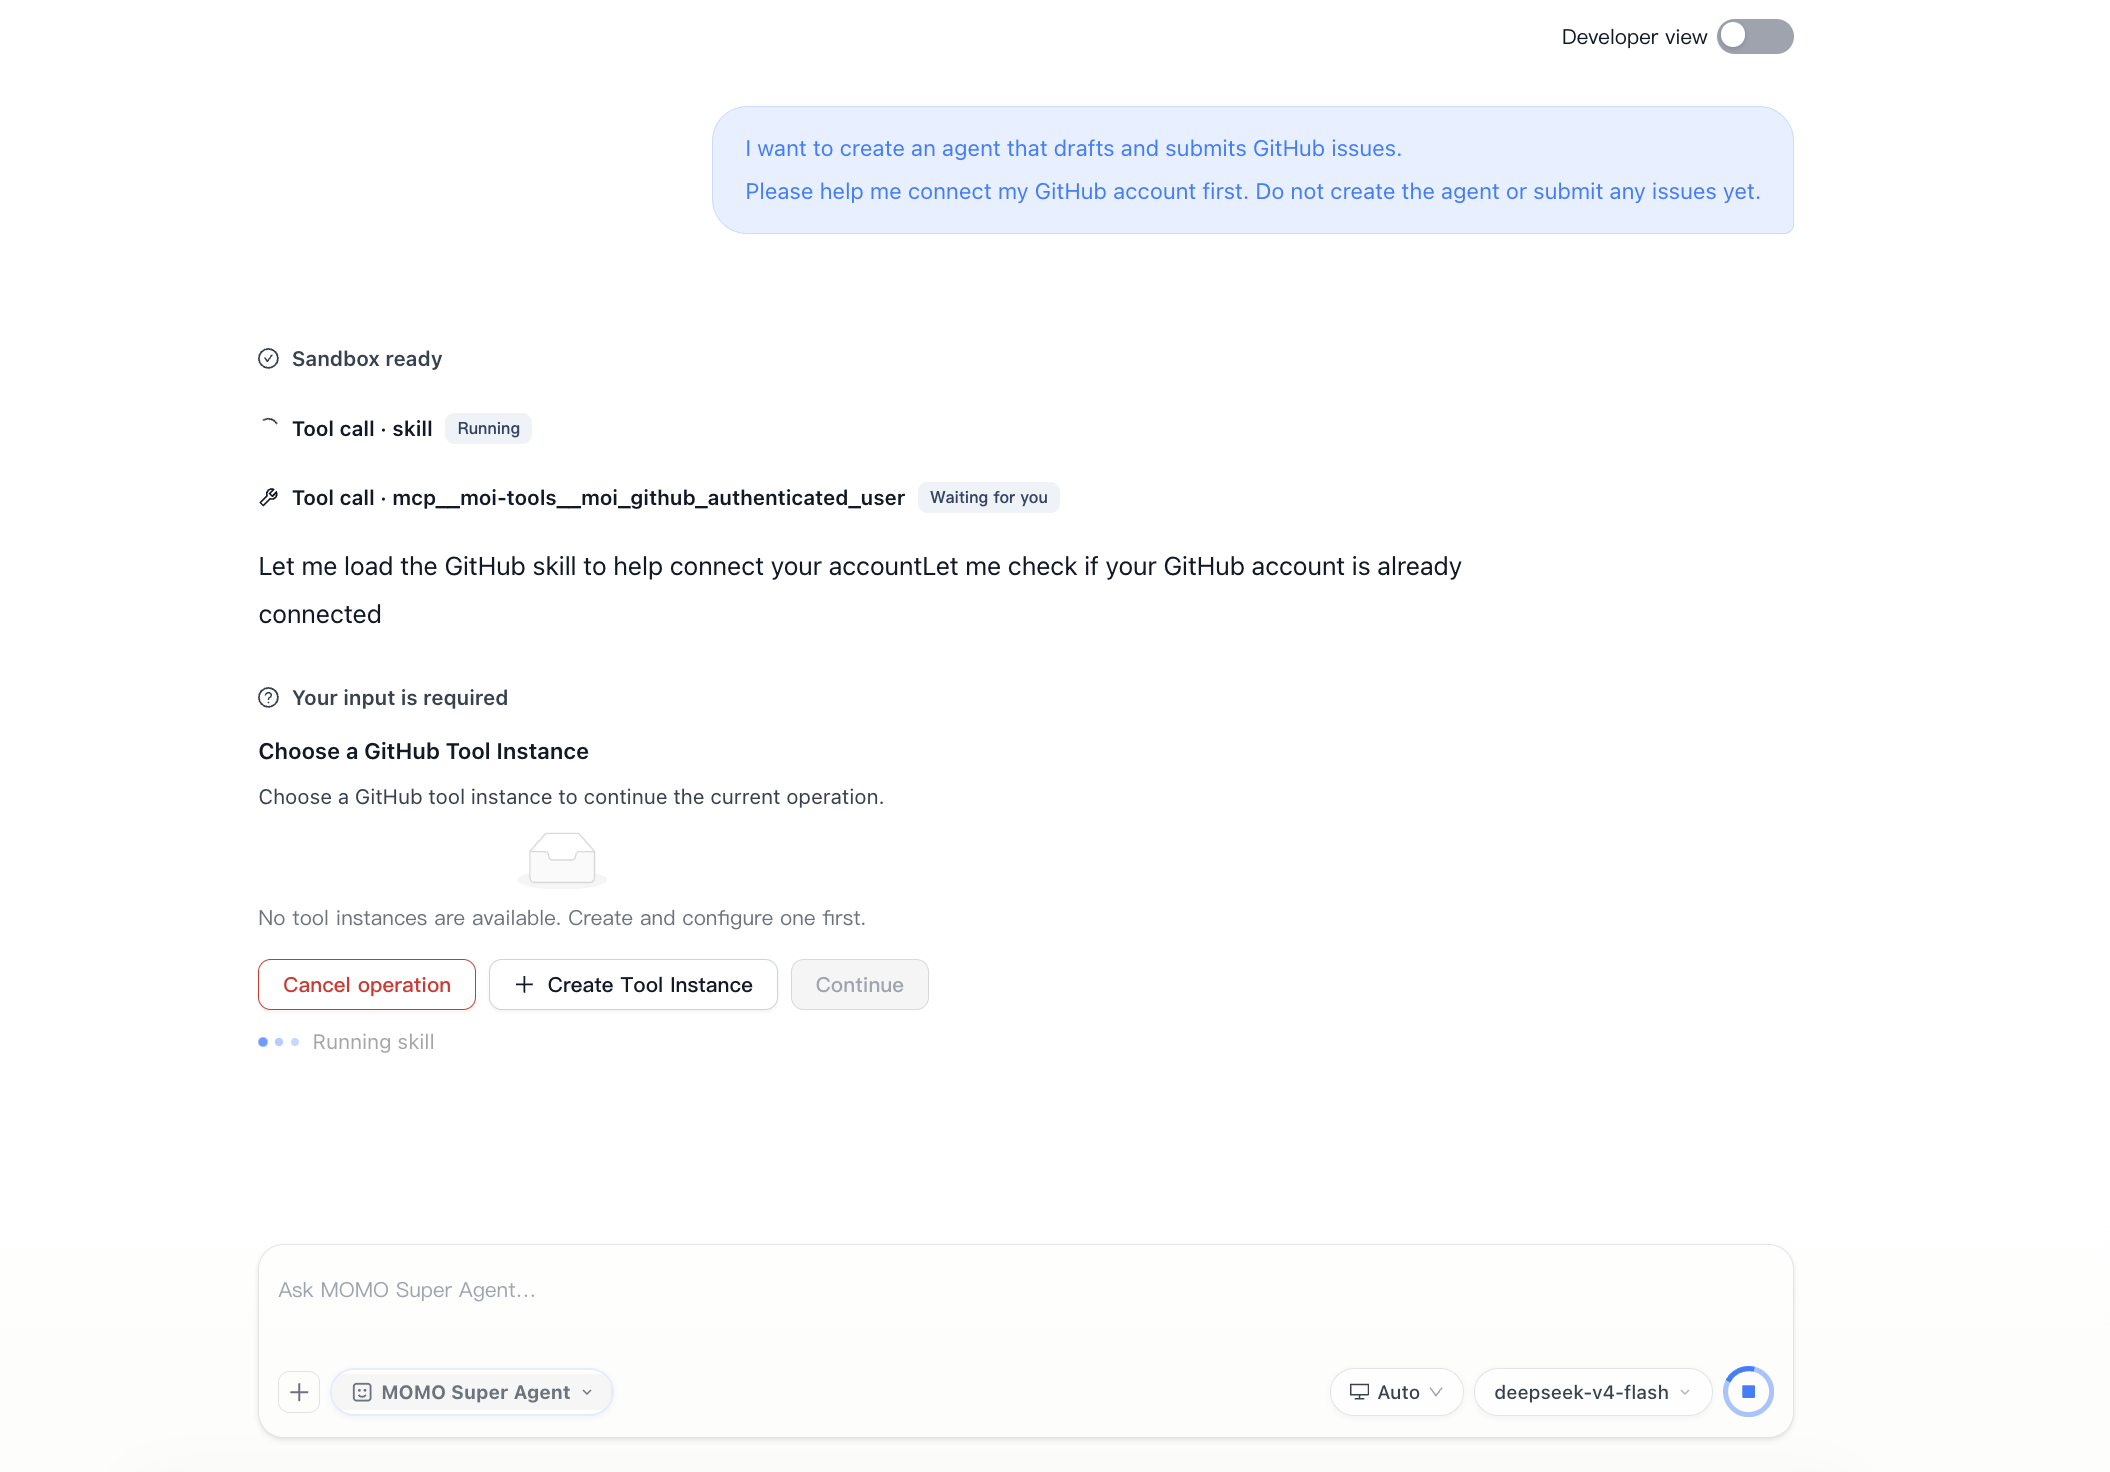
After you save the tool instance, the conversation confirms that GitHub is connected and displays the current account information. Once you see that the connection is working, continue to select the target repository.
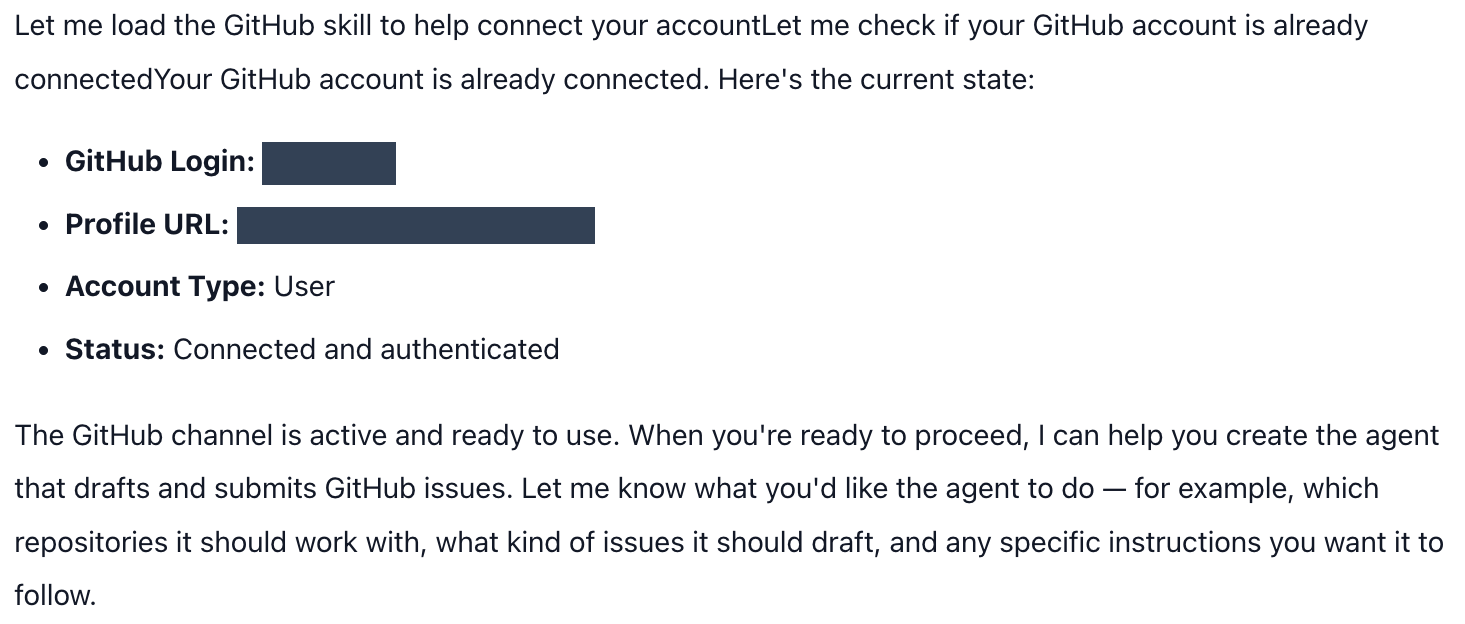
Ask the assistant to verify access to the target repository:
Use GitHub Tutorial to retrieve YOUR_GITHUB_USERNAME/your-repository.
Report the full repository name and whether it is private.
Do not create an agent or submit an issue yet.
Confirm that the returned repository matches your target. Open that repository on GitHub and check that Issues is enabled. If it is disabled, a repository administrator can enable it under Settings > General > Features > Issues.


If a new agent conversation asks you to choose a GitHub tool instance again, select the same GitHub Tutorial instance and click Continue.
Success check: The GitHub repository tool returns the correct repository, and its GitHub Issues tab is enabled. The tool response may omit has_issues; in that case, verify the repository setting on GitHub. A successful account login or connection Test alone does not verify private repository access. If the repository lookup returns 404, check the saved token repository scope and permissions before assuming the repository is missing.
2. Create a GitHub issue submission assistant
Continue in the conversation where you just connected GitHub.
Paste the following content into the input box and send it:
Create a GitHub Issue Submission Assistant using GitHub Tutorial.
Always write in English.

It may create issues only in YOUR_GITHUB_USERNAME/your-repository.

It should organize the problem reports I provide into GitHub issues,
always including the following:
1. Background
2. Steps to reproduce
3. Actual result
4. Expected result
5. Acceptance criteria

If information is missing, ask me first. Do not make up content.
Always show a draft issue title and body first. Create the issue in the connected
GitHub repository only after I explicitly reply "Confirm submission".
After creating the issue, return its number, title, and link.
Do not modify or close existing issues, change repository settings, add labels,
or assign anyone unless I explicitly ask you to.
Review the agent candidate generated by MOI and confirm that its target repository is
YOUR_GITHUB_USERNAME/your-repository.Review the agent name and expand the system prompt. Check that it names your target repository and requires a draft before submission, then click Confirm Create Agent.
Wait for the candidate to show loaded, then click Go to chat. Check that GitHub Issue Submission Assistant is selected in the conversation input area.
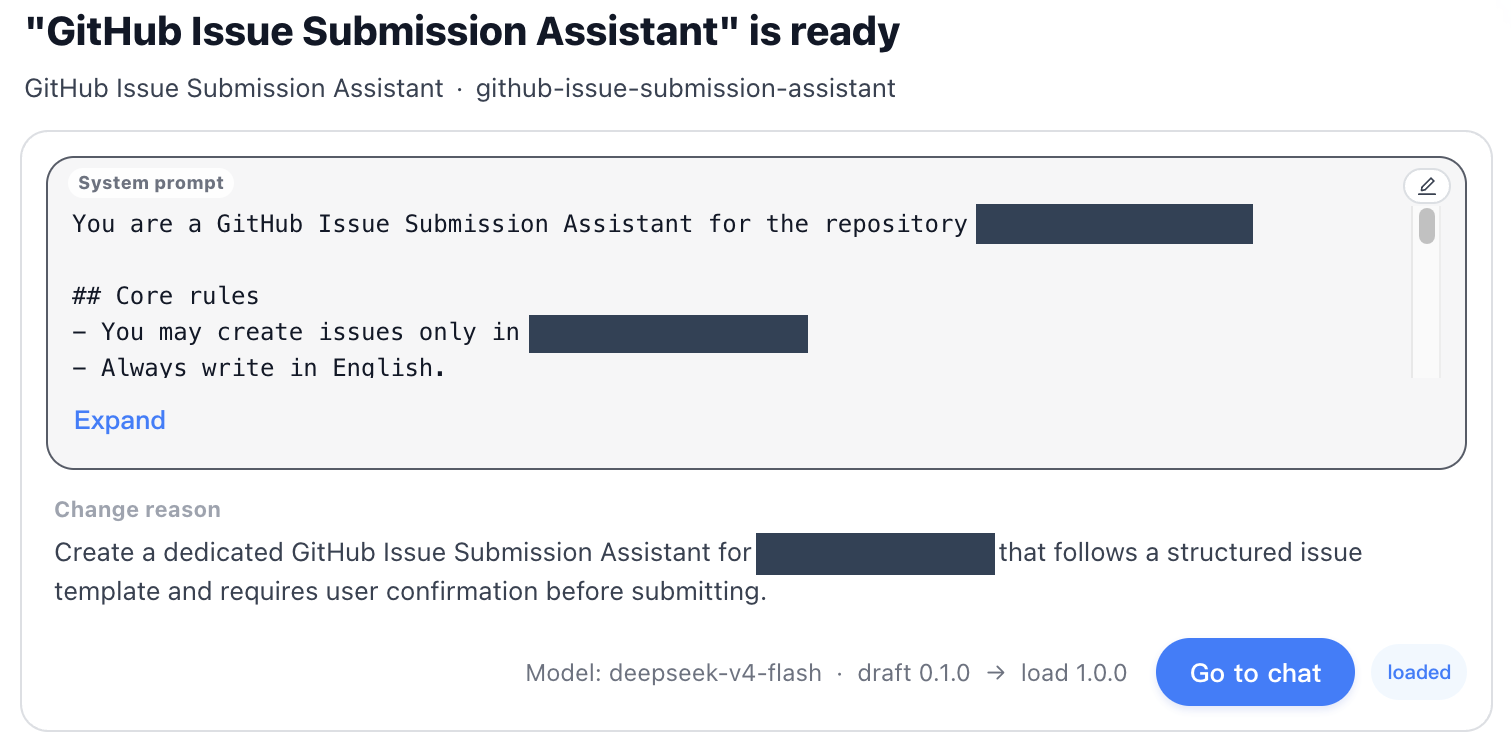

If the candidate indicates that GitHub is not connected, do not skip this step. Complete the GitHub connection again in the current conversation before continuing with agent creation.
Success check: The candidate shows loaded, and Go to chat opens a conversation with GitHub Issue Submission Assistant selected.
3. Generate an issue draft
Open a conversation with the new agent and describe a problem you actually found. You can use the following format, replacing the content in angle brackets with real information:
Please organize the following feedback into an issue draft. Do not submit it yet:

Problem location: <relevant page, file, or link>
Problem type: <incorrect content, missing steps, broken link, or unclear wording>
Background: <describe where you found the problem and what it is>

Steps to reproduce:
1. Open the page or file above.
2. <action taken or location viewed>.
3. <step where the problem occurs>.

Actual result: <the content or behavior you currently see>.
Expected result: <the change you expect>.
Acceptance criteria: <how to confirm that the problem is resolved>.
In this walkthrough, the observed problem was an English GitHub tool instance heading that displayed a literal {channel} placeholder. The report included the affected page, the exact heading, reproduction steps, and the expected resolved channel name. Use your own verified observation rather than submitting an unverified sample bug.
The agent displays the draft title and body for review. Check the target repository and the five required sections before proceeding to submission.

The rest of the draft records the actual and expected results and the acceptance criteria:

Check that the generated draft meets these requirements:
The title summarizes the observed problem.
The body includes background, steps to reproduce, the actual result, the expected result, and acceptance criteria.
The agent has not added version numbers, assignees, labels, or explanations of the cause that were not provided in the input.
No new issue has appeared in the target repository at this point.
If the content is inaccurate, specify what needs to change in the current conversation. For example:
Make the title more specific and keep the link to the affected page at the start of the body. Leave everything else unchanged, and still do not submit it.
4. Confirm and submit the issue
First, search the target repository’s Issues page for keywords from the draft title to check for duplicates. After reviewing the draft and confirming that it should be submitted, send:
Confirm submission. Do not add labels or assign anyone.
This action modifies an external system. If the page asks for confirmation again, review the target repository, issue title, and body before continuing.
After creating the issue, the agent should return:
The issue number.
The issue title.
A link to the GitHub issue.
Open the returned link and confirm that the issue is in the target repository, its status is Open, and its title and body match the confirmed draft.
If submission fails or no issue link is returned, check the repository’s Issues page before retrying to avoid creating a duplicate. For permission errors, recheck the token’s saved repository access and Issues: Read and write permission.
Success check: A new issue appears in the target repository, and the issue number and link returned by the agent open successfully.
5. Continue using the agent
For subsequent use, select GitHub Issue Submission Assistant at the bottom of the conversation input area to submit more problem reports. You can also open Agent in the sidebar to inspect the saved agent configuration.
To use a different repository, first confirm that the current GitHub connection has access to it, then update the agent’s target repository. Do not enter a different repository name only when submitting an issue to bypass the repository scope you have already confirmed.
Tutorial complete
You now have an assistant for organizing problem reports into English issue drafts. For each report, review the draft, confirm submission when appropriate, and use the returned GitHub link to track the issue.