

Extract key information from S3 engineering documents in bulk
Scenario
In engineering investigation and geological survey projects, business teams often accumulate large collections of borehole logs, PDFs, scans, and drawings in MinIO or another S3-compatible object store. Project registers, quality checks, and reporting need fields that can be queried directly—not a collection of files that someone must open one by one.
Without automation, a document specialist must download each file, find the borehole identifier and depth, copy the values into a business system, and record the processing status. As file volume grows, omissions and transcription errors become more likely, and it becomes difficult to answer, “Has this file been processed, and where is its result?”
The purpose of this scenario is to process a large collection of engineering documents that already exists in an S3 folder and convert every document into a verifiable, ingestible structured result rather than stopping after text recognition. MOI uses a Standard S3 connector for batch import, and an information-extraction workflow parses all imported files against the same schema.
The fields and results produced in this tutorial can support the following downstream actions. Adapt them to your own business system.
Extracted result |
Typical downstream use |
|---|---|
Borehole identifier |
Associate the file with a borehole record and detect missing or duplicate identifiers |
Borehole depth |
Write to an engineering register, compare with a design value, or aggregate project depth |
Structured JSON with source association |
Load results through an API, generate statistics, and trace a result back to its source file |
Processing status |
Track batch progress and route failures or missing required fields to manual review |
This tutorial walks you through building a batch-processing pipeline. MOI uses a Standard S3 connector to import the engineering files already stored in a MinIO folder into Catalog in one operation. You then run an information-extraction workflow manually, extract fields against a fixed schema, and write structured JSON to a result volume. For downstream integration, you can optionally query the workflow job and download artifacts through the API.
This tutorial uses a borehole log as an example and extracts the borehole identifier hole_id and borehole depth depth. The same process also applies to contracts, reports, forms, scans, and other documents that require a fixed set of fields.
Input |
Automated pipeline |
Final artifact |
|---|---|---|
A batch of existing PDFs, scans, or drawings in MinIO |
Standard S3 connector → one-time batch import → manually run the parsing and information-extraction workflow |
JSON or an artifact ZIP in the Catalog result volume |
Each step ends with a Completion check. Continue only after you see the expected result.
What you will complete
Create a Standard S3 connector for MinIO and import the files in a selected folder once.
Create a workflow from the Parsing and Information Extraction template and configure a JSON Schema.
Run the workflow manually to process the imported data volume as a batch.
Verify the import count, workflow job, and structured results.
If needed, use the API to query the job result and download JSON artifacts.
Reconcile the entire batch across the pipeline and retry only failed files or failed workflow jobs.
Before you begin
Prepare the following resources:
Have an MOI account. Use MOI Cloud sign in/sign up.
An MOI workspace where you can create connectors, import tasks, Catalog volumes, and workflows;
A MinIO bucket and folder containing the files to process, the MinIO S3 API endpoint, and an Access Key that can read that path;
A model that can parse documents and extract information;
A personal access token with access to the target workspace, for use with the optional result-API section;
The synthetic sample package supplied with this tutorial.
Download the synthetic sample package
Download and extract the synthetic S3 engineering-document sample package. Every project name, identifier, date, value, and layout in the package was created from scratch for this tutorial. It contains no real customer or engineering-project information.
File |
Purpose |
Expected result |
|---|---|---|
|
First end-to-end validation |
Extract |
|
Validate removal of OCR-inserted spaces |
Normalize the identifier to |
|
Validate exception routing |
The required depth is absent; do not accept the file as a valid business record and route it to manual review |
The package also contains a ready-to-copy schema, expected JSON for the two valid cases, and acceptance criteria for every case.
The following table lists the example names used in this tutorial. In your environment, use the bucket, volume, and workflow names that already exist or that you actually create, while keeping the input and result volumes clearly separated.
Object |
Example name or location |
|---|---|
S3 source folder |
|
MinIO Standard S3 connector |
|
Source Catalog volume |
|
Result Catalog volume |
|
Workflow |
|
Steps
1. Create and test the MinIO connector
MinIO exposes an S3-compatible object-storage interface, so select Standard S3 in MOI rather than looking for a separate MinIO connector type. This step stores connection parameters only; it does not import files.
Before opening MOI, confirm the following in MinIO:
The bucket that will store the engineering files;
The prefix containing the files to process, such as
incoming/borehole-logs/;The MinIO S3 API endpoint, not the browser URL for MinIO Console; and
An Access Key ID and Access Key Secret with read access to the target bucket and prefix.
Then create the connector in MOI:
Sign in to MOI and confirm that the workspace for this tutorial appears in the top-left corner.
Go to Data Connection > Connectors.
Click New Connector.
Enter
conn_s3as the connector name.Select Object Storage > Standard S3.
Select at least Import as the purpose. If later export tasks will reuse the connector, you can also select Export.
Complete the connection form as follows:
Field |
MinIO value |
Guidance |
|---|---|---|
Endpoint |
MinIO S3 API address |
Include the protocol and port; do not use the Console URL |
AccessKey ID |
Access Key for the MinIO user |
Grant only the permissions required for the target bucket and prefix |
AccessKey Secret |
Matching Secret Key |
Enter the Secret Key that matches the AccessKey ID |
File path |
|
Combine the bucket name and source prefix without |
S3 address style |
Path Style |
Use the address style configured for your MinIO service |
Region |
Region configured in MinIO |
Leave it empty when optional; when required, it must match the server |
Click Test Connection. After the success message appears in the upper-right corner, click Confirm.
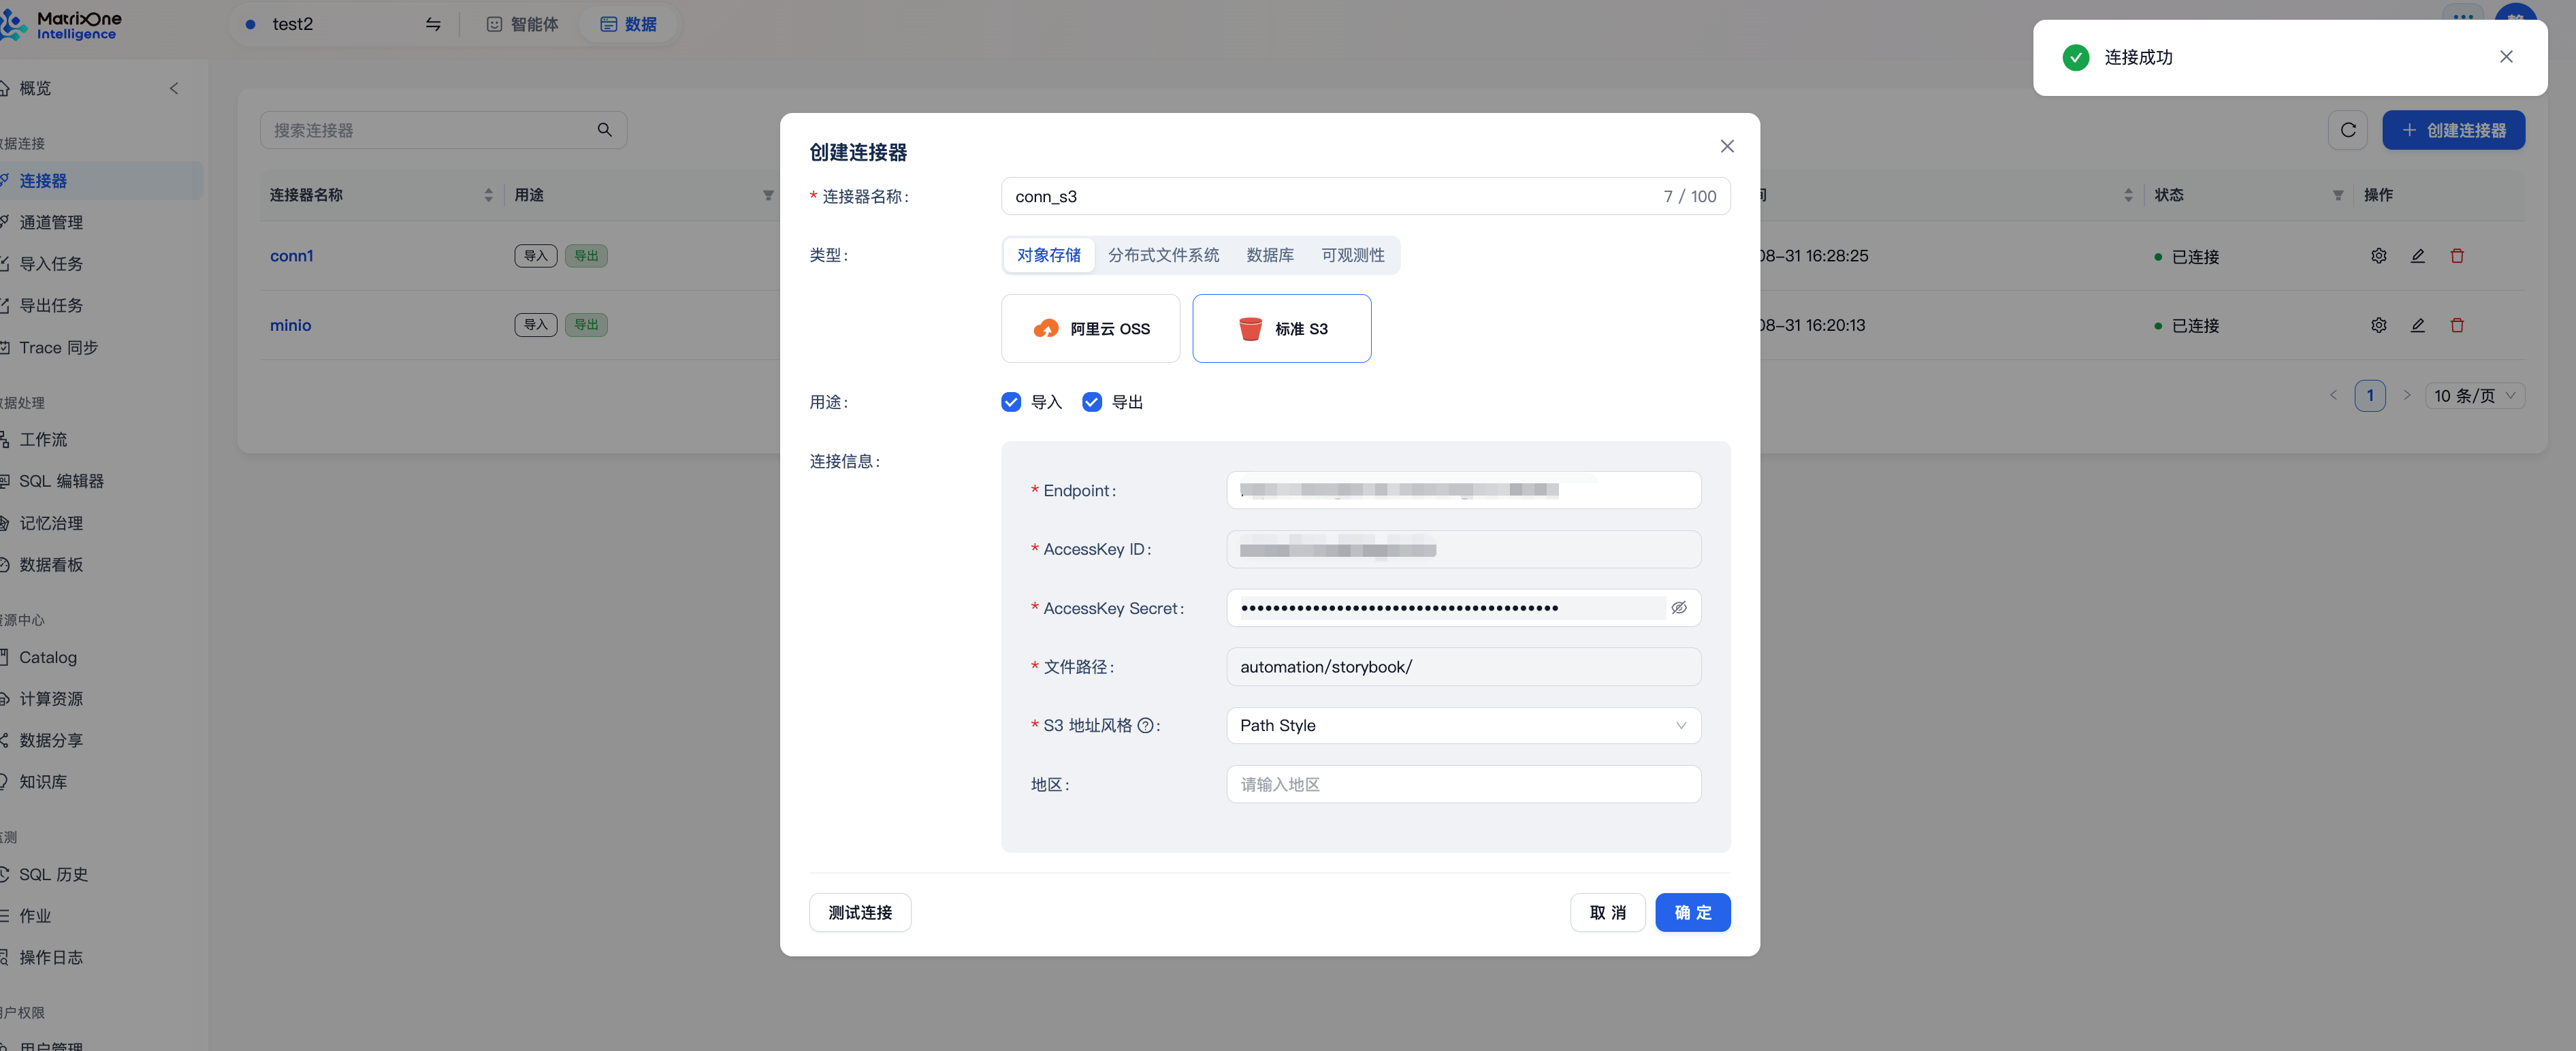
The screenshot uses the Chinese interface, and all endpoint and access-key values are redacted.
Return to the connector list and locate
conn_s3. Confirm that its type is Standard S3, its status is Connected, and its purposes include Import.
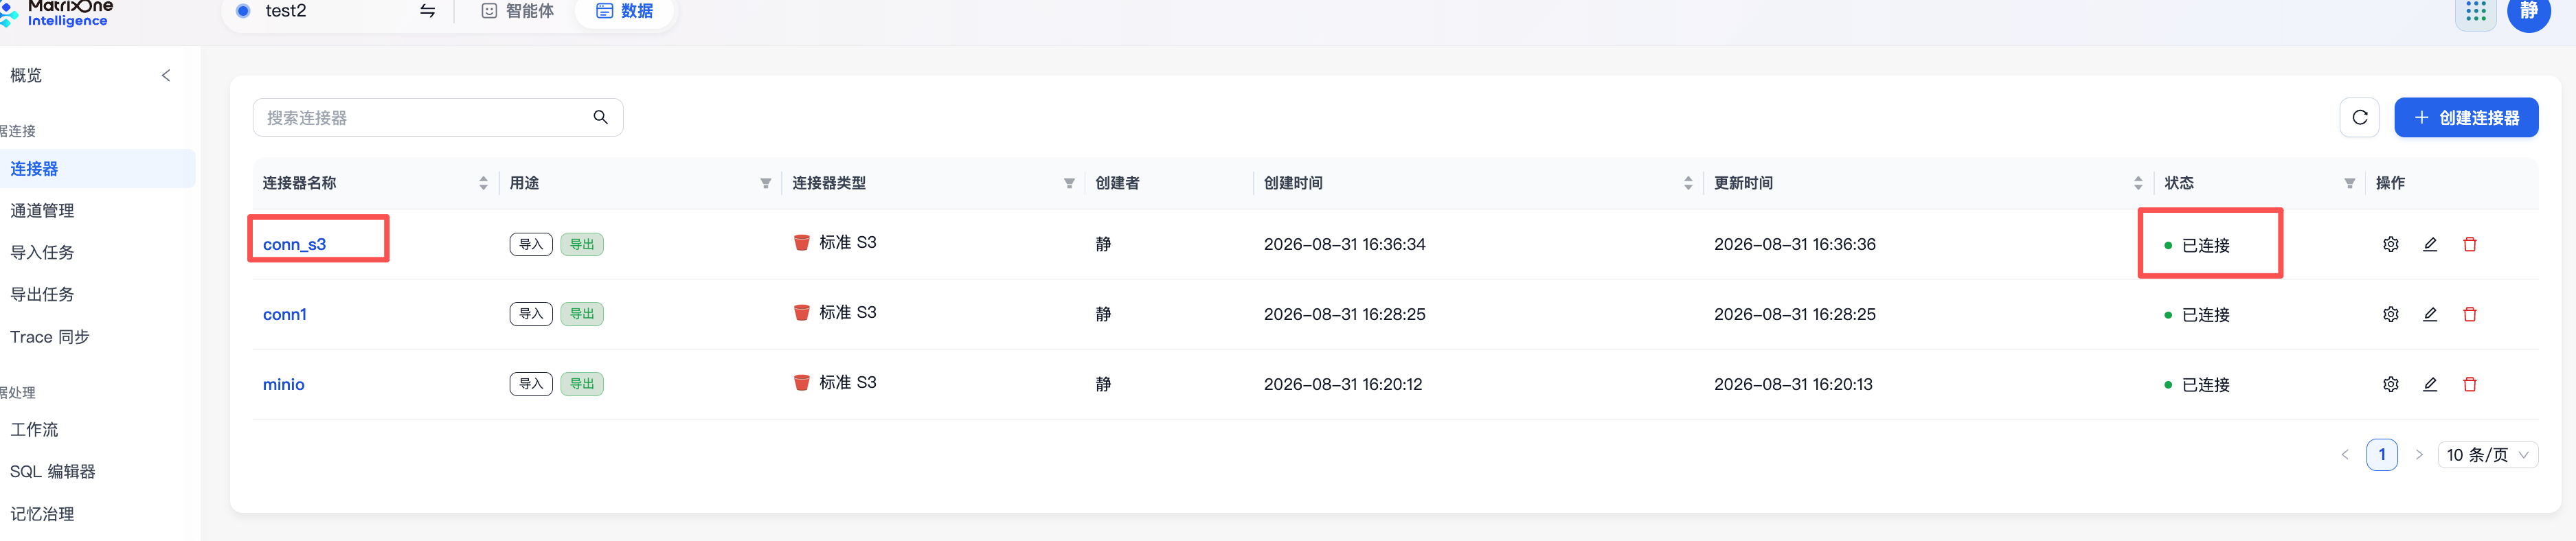
The connection test verifies only that the current parameters can access MinIO. It does not validate the files, filtering rules, target volume, or Catalog write permissions selected by the import task.
Completion check: The connector list contains conn_s3; its type is Standard S3, its status is Connected, and its purposes include Import.
For other connector types, purposes, editing, and permission rules, see Connectors.
2. Create the source and result volumes
Next, prepare two locations in Catalog: one to receive source files imported from MinIO and one to store information-extraction results.
Go to Resource Center > Catalog.
Create the Catalog
engineering_automationand databasedocuments.Under
documents, create a volume namedincoming.In the same database, create a volume named
extracted.Confirm that both volumes are empty.
Separating inputs and outputs lets you compare the number of imported files with the number of produced results. It also prevents artifacts from a previous batch from becoming inputs to the next workflow run.
Completion check: Catalog contains both engineering_automation / documents / incoming and engineering_automation / documents / extracted, and both volumes are empty.
3. Import the S3 folder once
This scenario assumes that the MinIO folder already contains a large collection of engineering files. The import task runs once and writes all currently eligible files in the selected folder to the input data volume as a batch.
To validate the tutorial with synthetic data, first upload the three PDFs from the package’s input/ directory to a test folder in MinIO. For real data, use your own bucket, folder, and file count.
Go to Data Connection > Import Tasks and click Create Import Task.
For the import type, select Unstructured.
Set the data source to Connector Source (shown as Connector Data Source in some versions), and then select the
conn_s3connector.Select the target data volume that will receive this batch. If you followed the tutorial example, you can select
engineering_automation / documents / incoming.Set the import mode to One-time.
Set the parsing strategy to Flatten. If a downstream process needs the MinIO directory hierarchy, select Preserve Directory Structure instead.
Under the deduplication strategy, select both File Name and MD5, and set the duplicate-file action to Skip.
Under the processing scope, retain the PDF, Word, and image types required by this batch. Leave Path Regex empty unless you need additional path-based filtering.
In the Import Files list at the bottom of the page, find and select the MinIO folder that actually contains the source documents. Select the folder row instead of selecting files individually.
Click Create and Start Import.
Return to the Import Tasks list, wait until the status changes to Completed, and open the details to verify the successful, failed, and skipped file counts.
For a large collection, record the total count and size of S3 objects that match the filters before starting. When using a new file type or parsing configuration, validate a smaller test folder first and then import the full batch.
Completion check: The one-time import task is complete; the connector, source folder, and target volume are correct; and the sum of successful, failed, and skipped files reconciles with the number of S3 files in scope for this batch.
For the complete rules for one-time import, deduplication, and retrying failed files, see Data Loading.
4. Create an information-extraction workflow from a template
This step creates a workflow that parses engineering files and extracts information according to a schema. You will configure four nodes in order: read, parse, extract, and save.
Go to Data Processing > Workflows.
Click Create Workflow.
In the Create Workflow window, find Parsing and Information Extraction and click Use Template.
Enter
engineering_document_extractionas the workflow name.
4.1 Configure Read MOI Volume v2
In the workflow editor, click Run Parameters, and then select Read MOI Volume v2 on the left.
For Compute Resource, keep Follow Workflow Default.
Under Source File, select the data volume that actually receives the imported files. If you followed the earlier example in this tutorial, you can select
engineering_automation / documents / incoming; otherwise, use the volume you created in your environment.Under File Scope, select By File Type. Select at least Document for this scenario. If the MinIO folder also contains standalone scanned images, select the image types you actually use.
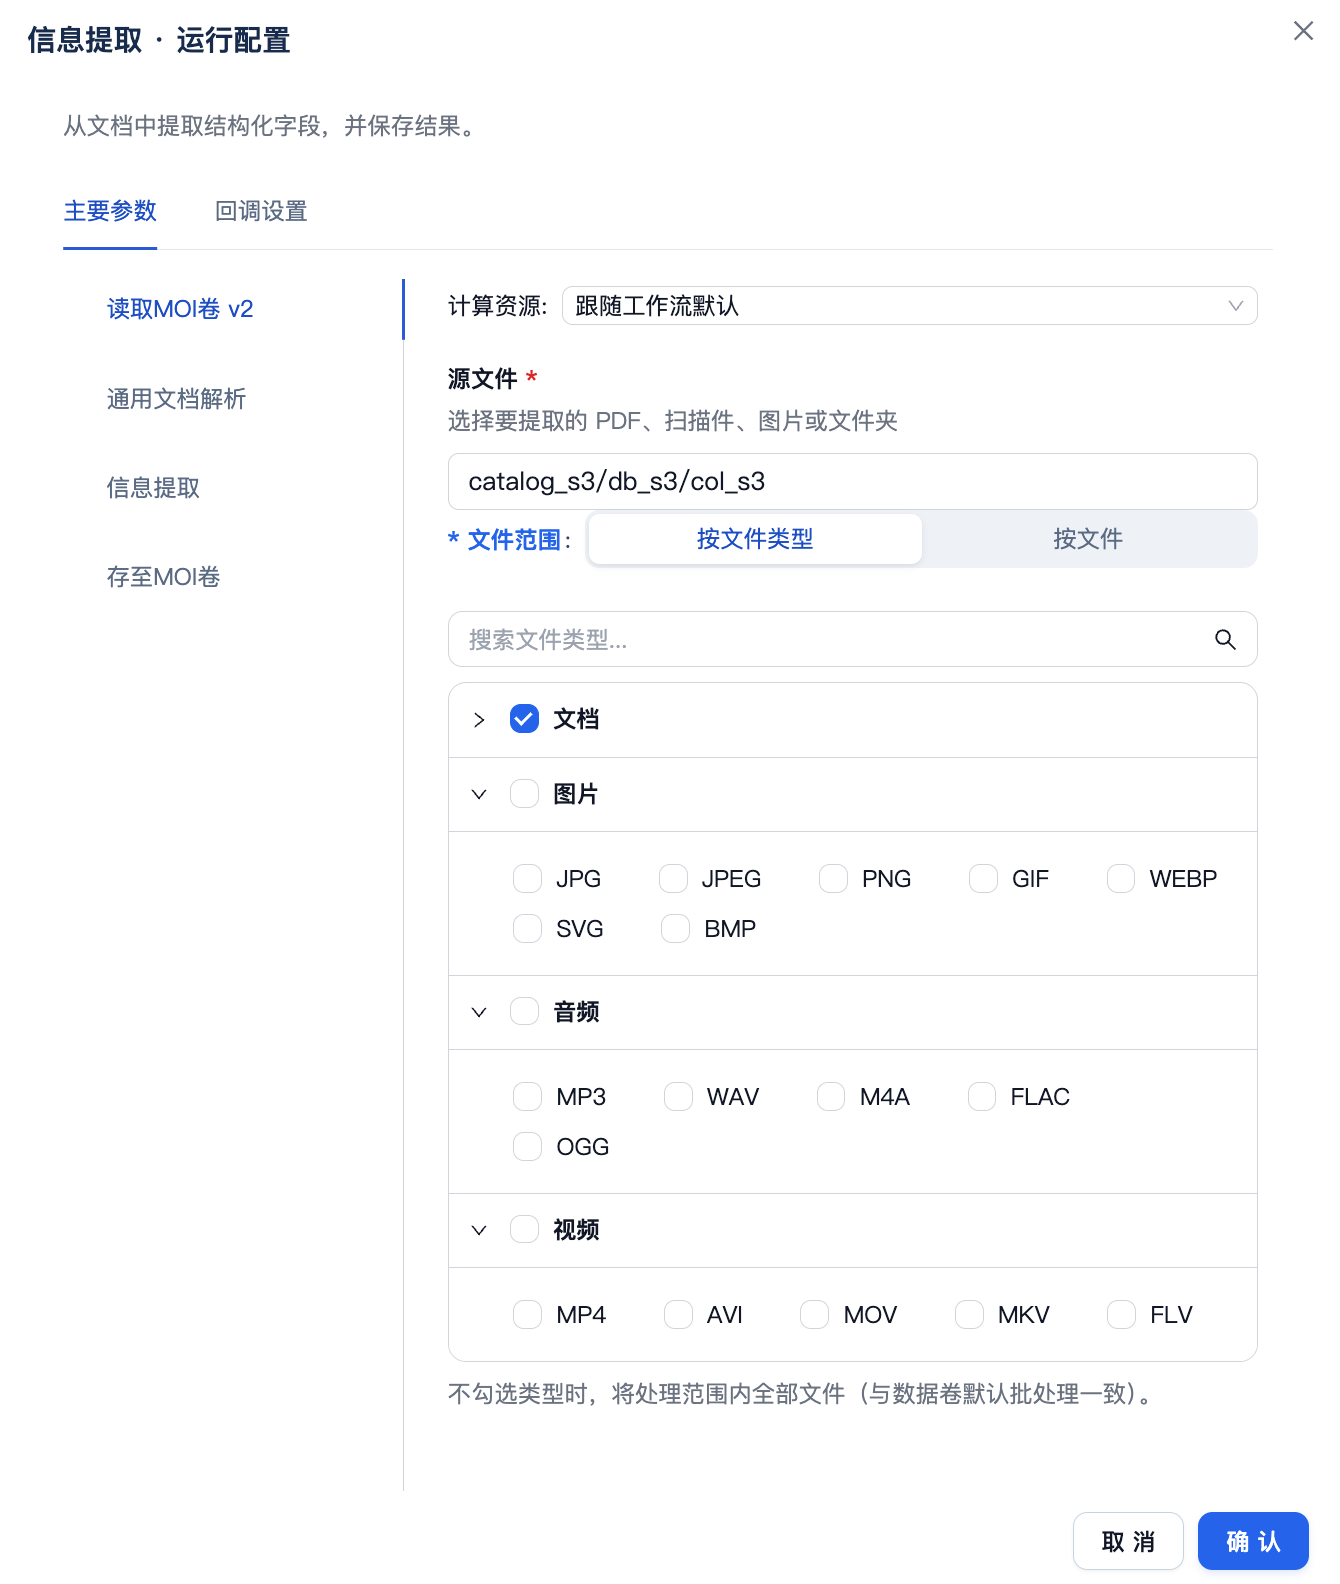
The catalog_s3 / db_s3 / col_s3 path in the screenshot is an interface example, not a required path.
4.2 Configure General Document Parsing
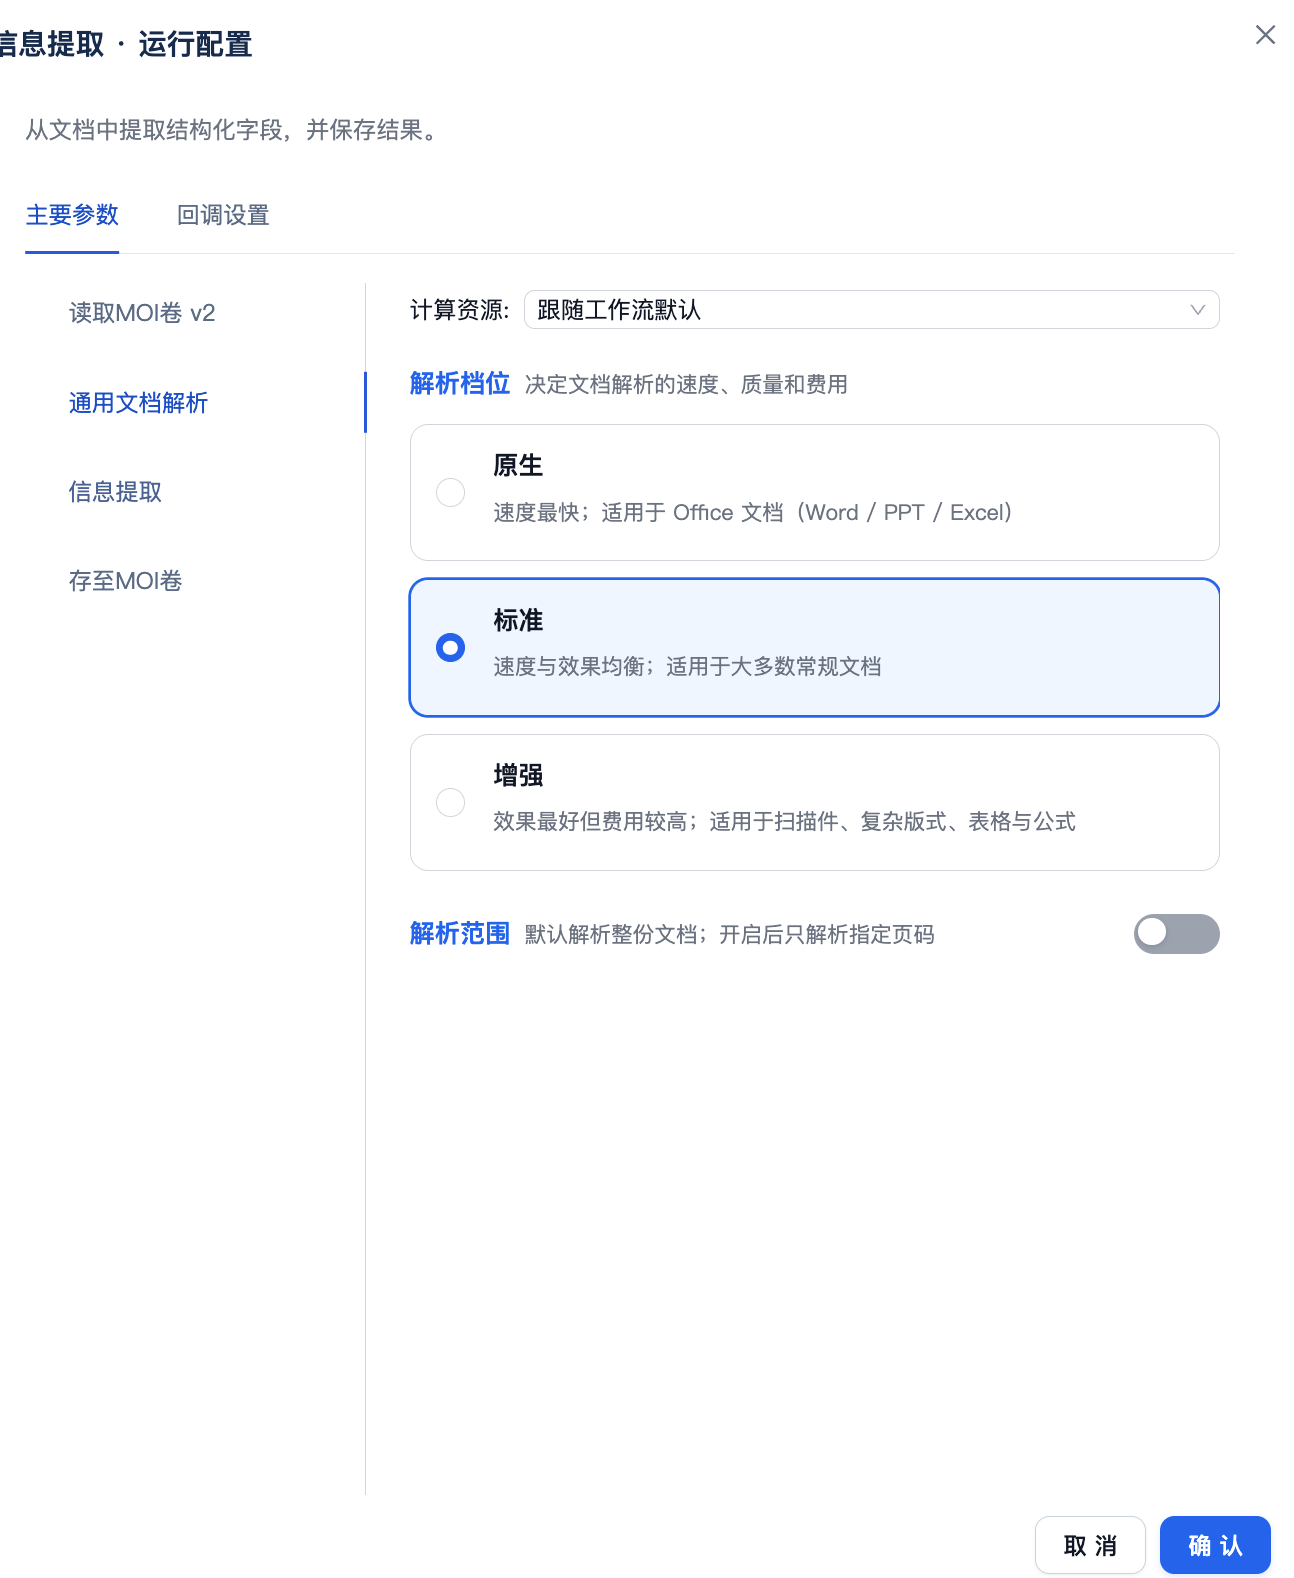
Select General Document Parsing on the left.
Set Parsing Tier to Standard for a balance of parsing speed, quality, and cost.
Keep Parsing Range disabled to parse the entire document. Enable it and enter a page range only when you need to process specific pages.
If the input consists mainly of Office documents and speed is the priority, use Native. If the input contains scanned pages, complex layouts, tables, or formulas and the Standard tier is insufficient, use Enhanced.
4.3 Configure Information Extraction
Select Information Extraction on the left.
Set Configuration Method to JSON Configuration.
Paste the following schema into Extraction Field Definition, retaining both
descriptionandrequired:
{
  "type": "object",
  "properties": {
    "depth": {
      "type": "string",
      "description": "Borehole depth. Extract the number and the unit m; it usually appears in the final borehole depth field. Remove the space between the number and unit in the output; for example, output 35.8 m as 35.8m."
    },
    "hole_id": {
      "type": "string",
      "description": "The identifier immediately before '钻孔柱状图' in the title at the top of the borehole log. Remove extra spaces introduced by OCR while preserving hyphens; for example, output D E M O - Z K - 0 0 2 as DEMO-ZK-002."
    }
  },
  "required": ["depth", "hole_id"]
}
The description text explains each field’s meaning, location, and output format, and directly affects extraction quality. This example already places its constraints in each field’s description, so you can leave Additional Instructions empty. Use that field only for rules that apply to every extracted field.
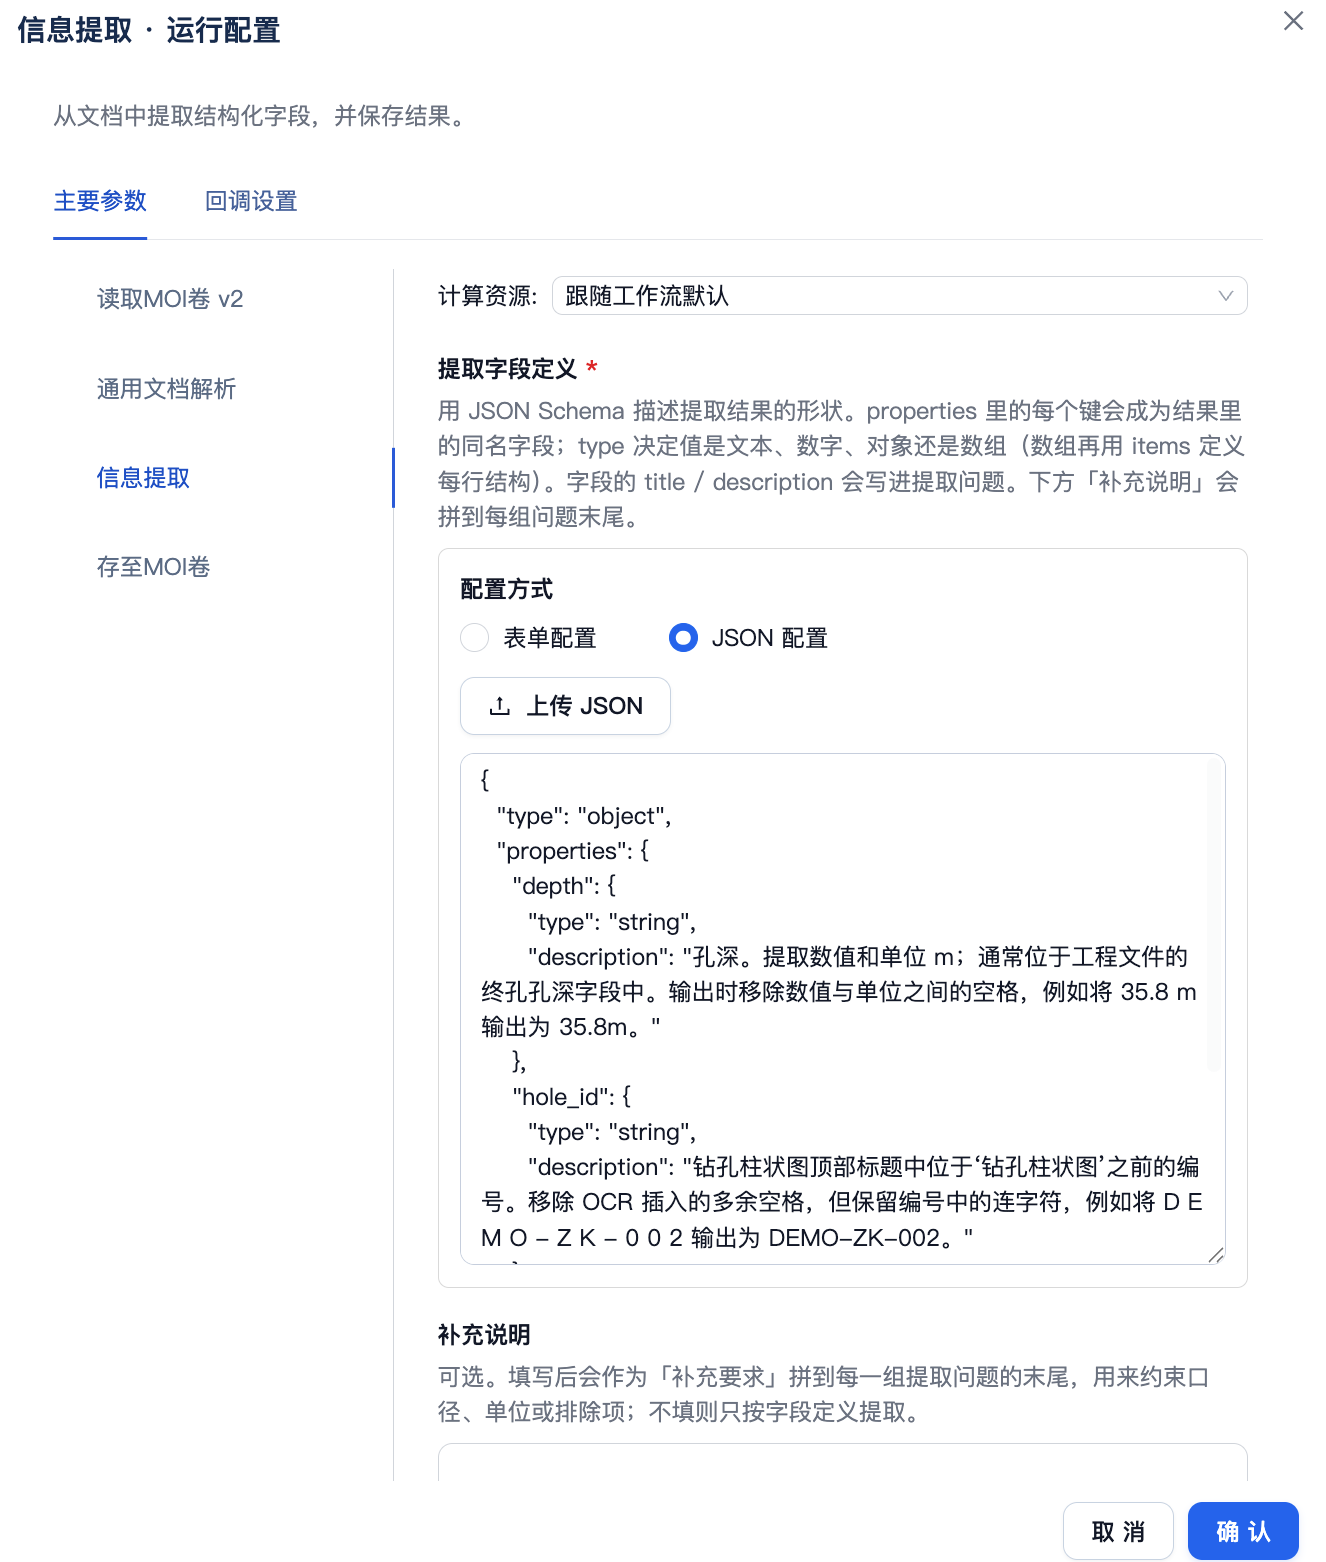
4.4 Configure Save to MOI Volume
Select Save to MOI Volume on the left.
Under Output Location, select the data volume that actually stores the extraction results. If you followed the earlier example in this tutorial, you can select
engineering_automation / documents / extracted; otherwise, use the result volume you created in your environment.Do not use the input data volume as the output location, because a later batch run could treat a result file as a new input.
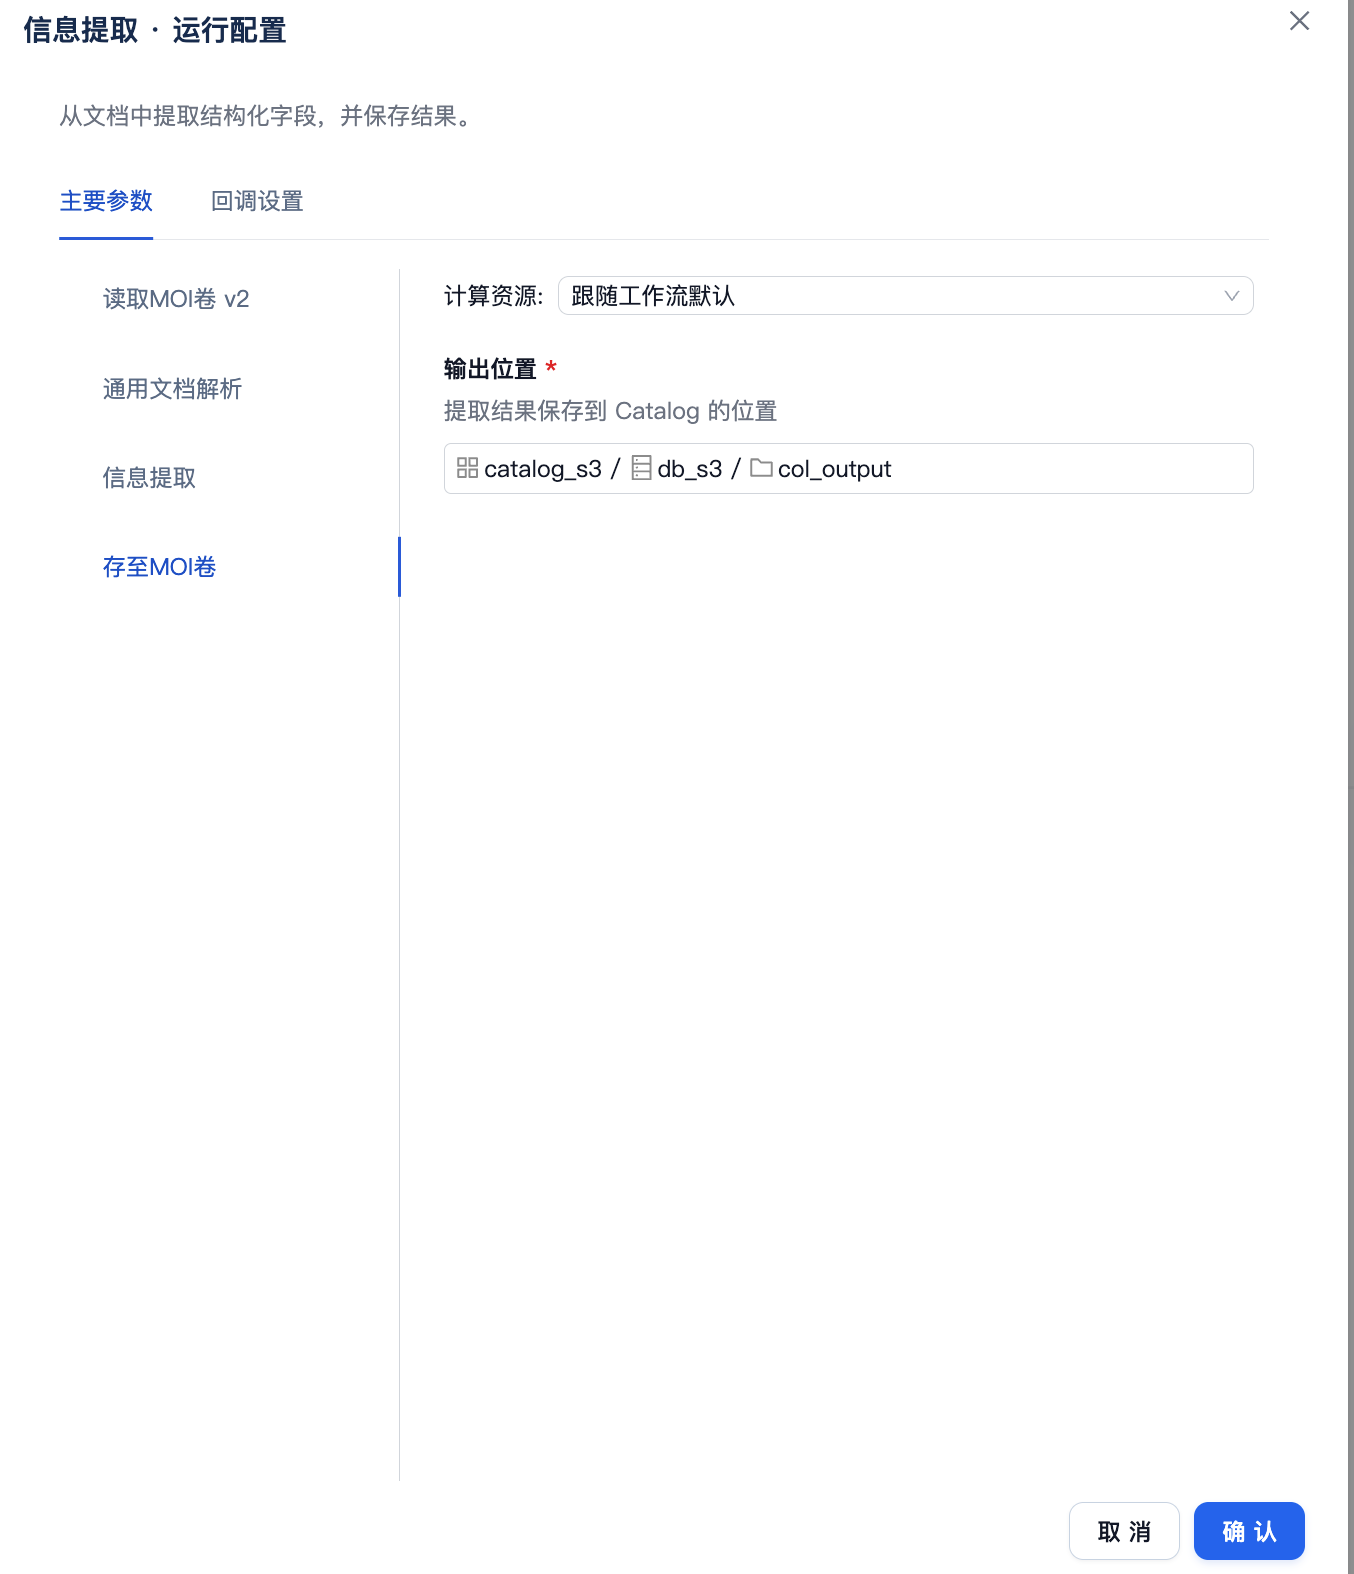
The catalog_s3 / db_s3 / col_output path in the screenshot is an interface example. After configuring all four nodes, click Confirm, keep the template’s default result-naming rule, and save the workflow.
Select Parsing and Information Extraction, not another template that writes its result to a data table. This tutorial delivers JSON files, so you do not need to configure an additional embedding model.
Completion check: Read MOI Volume v2 and Save to MOI Volume point to the input and result volumes actually used in your environment; General Document Parsing uses an appropriate parsing tier; and Information Extraction contains the two required fields depth and hole_id.
For the differences among a workflow definition, a run, and a workflow execution, see Workflow.
5. Run the batch workflow manually
This scenario processes a batch that has already been imported into a data volume, so you run the workflow manually.
Confirm that the one-time import task is complete and that the file count in the input data volume matches the import result for this batch.
Click Save and Enable.
On the workflow page, click Run to open the parameter confirmation window for this run.
Verify the input volume and file-type scope under Read MOI Volume v2, and verify the output location under Save to MOI Volume.
Confirm the parameters, start the run, and view the batch-job status under Monitoring > Jobs.
If the input volume also contains files from other batches, use a separate volume or a more precise file scope during import so that unrelated files are not included in this run.
Completion check: The workflow is enabled and one manual run has started successfully. The job details show the input volume, file scope, and output volume for this batch.
6. Inspect the batch job and extraction results
Go to Monitoring > Jobs and filter by the workflow name
engineering_document_extraction.Find the batch job you started manually and wait until its status changes to Completed. If it fails, open the first failed node and inspect the error.
Open the job details and confirm that the read, parse, information-extraction, and result-saving nodes all ran.
Open the result data volume configured in your environment. If you followed the tutorial example, open
engineering_automation / documents / extracted.Use the source-association information to match every result file to its S3 source file.
Open the primary result whose name ends in
_extract.jsonand confirm that valid files contain bothdepthandhole_id.
The two valid files in the synthetic package should produce these values:
Input file |
|
|
|---|---|---|
|
|
|
|
|
|
The title in demo-borehole-log-002.pdf intentionally contains extra spaces, so the result must not retain OCR-style spaces. demo-borehole-log-missing-depth.pdf lacks a required business value. Depending on the model and product version, it might produce a schema-validation failure, a failed job, or a result without depth. In every case, do not accept it as a valid business record; route it to manual review.
Completion check: The input files, job processing records, and output results for this batch can be reconciled. The two valid examples match their expected values, and the file without a depth value does not enter valid business data.
For information about inspecting a failed node, its inputs and outputs, and its logs, see Run and Debug.
7. Retrieve batch results through the API (optional)
If a downstream system needs to consume batch results automatically, it can query the status and download artifacts through the API after the manual job completes. First obtain the workflow ID and execution ID from the MOI job details, and then prepare the result volume ID.
Set variables in a controlled terminal:
export AI_STUDIO_API_KEY="<YOUR_API_KEY>"
export WORKSPACE_ID="<YOUR_WORKSPACE_ID>"
export WORKFLOW_ID="<YOUR_WORKFLOW_ID>"
export EXECUTION_ID="<YOUR_EXECUTION_ID>"
export RESULT_VOLUME_ID="<YOUR_RESULT_VOLUME_ID>"
First query the workflow execution result once to confirm that this manual run has reached a terminal state:
curl "https://moi.matrixorigin.cn/newmoi/workflow/v2/workflow-apps/$WORKFLOW_ID/executions/$EXECUTION_ID/result" \
  -H "X-API-Key: $AI_STUDIO_API_KEY" \
  -H "X-Workspace-ID: $WORKSPACE_ID" \
  | jq '.data.result | {status, case_result, case_error}'
Continue to the download only when status indicates that the execution is completed. If case_result already contains the primary JSON, the downstream system can consume it directly. When the workflow writes the result as a file, first list the files in the result volume:
curl -X POST "https://moi.matrixorigin.cn/newmoi/catalog/file/list" \
  -H "X-API-Key: $AI_STUDIO_API_KEY" \
  -H "X-Workspace-ID: $WORKSPACE_ID" \
  -H 'Content-Type: application/json' \
  -d '{
    "filters": [
      {
        "name": "volume_id",
        "values": ["'"$RESULT_VOLUME_ID"'"]
      }
    ],
    "page": 1,
    "page_size": 100
  }' \
  | jq '.data.list[] | {id, name, ref_file_id, ref_workflow_id, workflow_role}'
The example queries 100 items per page. If the batch produces more than 100 results, increment page and continue until the returned list is empty. Do not treat the first page as the entire batch.
Use ref_file_id, ref_workflow_id, and the source file name to locate the output for this workflow execution, then record its id:
export RESULT_FILE_ID="<MATCHED_RESULT_FILE_ID>"
Then download the corresponding file:
curl -X POST "https://moi.matrixorigin.cn/newmoi/catalog/file/download" \
  -H "X-API-Key: $AI_STUDIO_API_KEY" \
  -H "X-Workspace-ID: $WORKSPACE_ID" \
  -H 'Content-Type: application/json' \
  -d '{
    "file_id": "'"$RESULT_FILE_ID"'",
    "volume_id": "'"$RESULT_VOLUME_ID"'",
    "as_zip": true
  }' \
  -o engineering-result.zip
Repeat the match–record ID–download sequence for the batch, or iterate over the paginated results in a downstream program.
Inspect the archive and read the primary extraction result:
unzip -l engineering-result.zip
unzip -p engineering-result.zip '*_extract.json' | jq .
Do not treat a 2xx API response as proof that the business operation succeeded. The downstream system must also confirm that the workflow execution is completed and that the result file is readable. Use the association between the source file and workflow execution to avoid downloading the wrong file.
Completion check: The API returns a completed status for the manual job. The primary extraction JSON is readable from the downloaded ZIP and matches the result shown in the interface.
For complete fields, see Query workflow job results, Query file list, and Download file.
8. Reconcile batch results and exception files
For a large collection, do not rely on only one page. Before processing, record the number N of objects in the S3 source folder that match the filters. After the job completes, reconcile the batch in this order:
Checkpoint |
Passing criterion |
|---|---|
S3 source folder |
The number of objects in scope is |
One-time import task |
Successful, failed, and skipped files add up to |
Input data volume |
Its file count matches the successful import count, with no unexpected duplicates |
Manual workflow job |
The job reached a terminal state and its processing scope matches the batch input |
Result data volume |
Valid files have traceable results; exception files are not accepted as valid records |
For the synthetic package, N is 3: the two valid files should produce the expected JSON, and the file without a depth should go to manual review. For a real large batch, compare “valid results + business exceptions + technical failures” with the successful import count. Every difference must be explainable.
If a file import fails, select only the failed file in the import-task details and click Retry. If the workflow job fails, inspect the first failed node and its error before retrying based on the cause. Rerunning a document with a genuinely missing business field cannot supply a real value, so route it directly to manual review. If the model reports that the input exceeds its context limit, reduce the page range, split the file, or change the model instead of repeatedly submitting the same input.
Completion check: The batch reconciles across S3, the import record, the input volume, the workflow job, and the result volume. Valid files produce the expected JSON, and exception files do not enter valid business data.
Tutorial complete
You have completed S3 engineering-file extraction:
imported a batch of files from MinIO;
extracted fixed fields with a workflow; and
produced structured JSON in the result volume.