

Use Genesis models in Codex App
This tutorial is for the Codex desktop app. To select a Genesis model in the app, configure a model provider and model catalog. This tutorial uses glm-5.3: get a key and connection details from MOI, choose setup through a Codex App conversation or edit the configuration yourself, then restart the app and select the model.
Custom Codex models use the Responses API. Confirm that the target Genesis model supports Responses before starting. A successful Chat Completions request does not establish this compatibility. See the official Codex requirements.
1. Create an API token in MOI
Click your avatar in the upper-right corner of MOI and select Access Credentials.
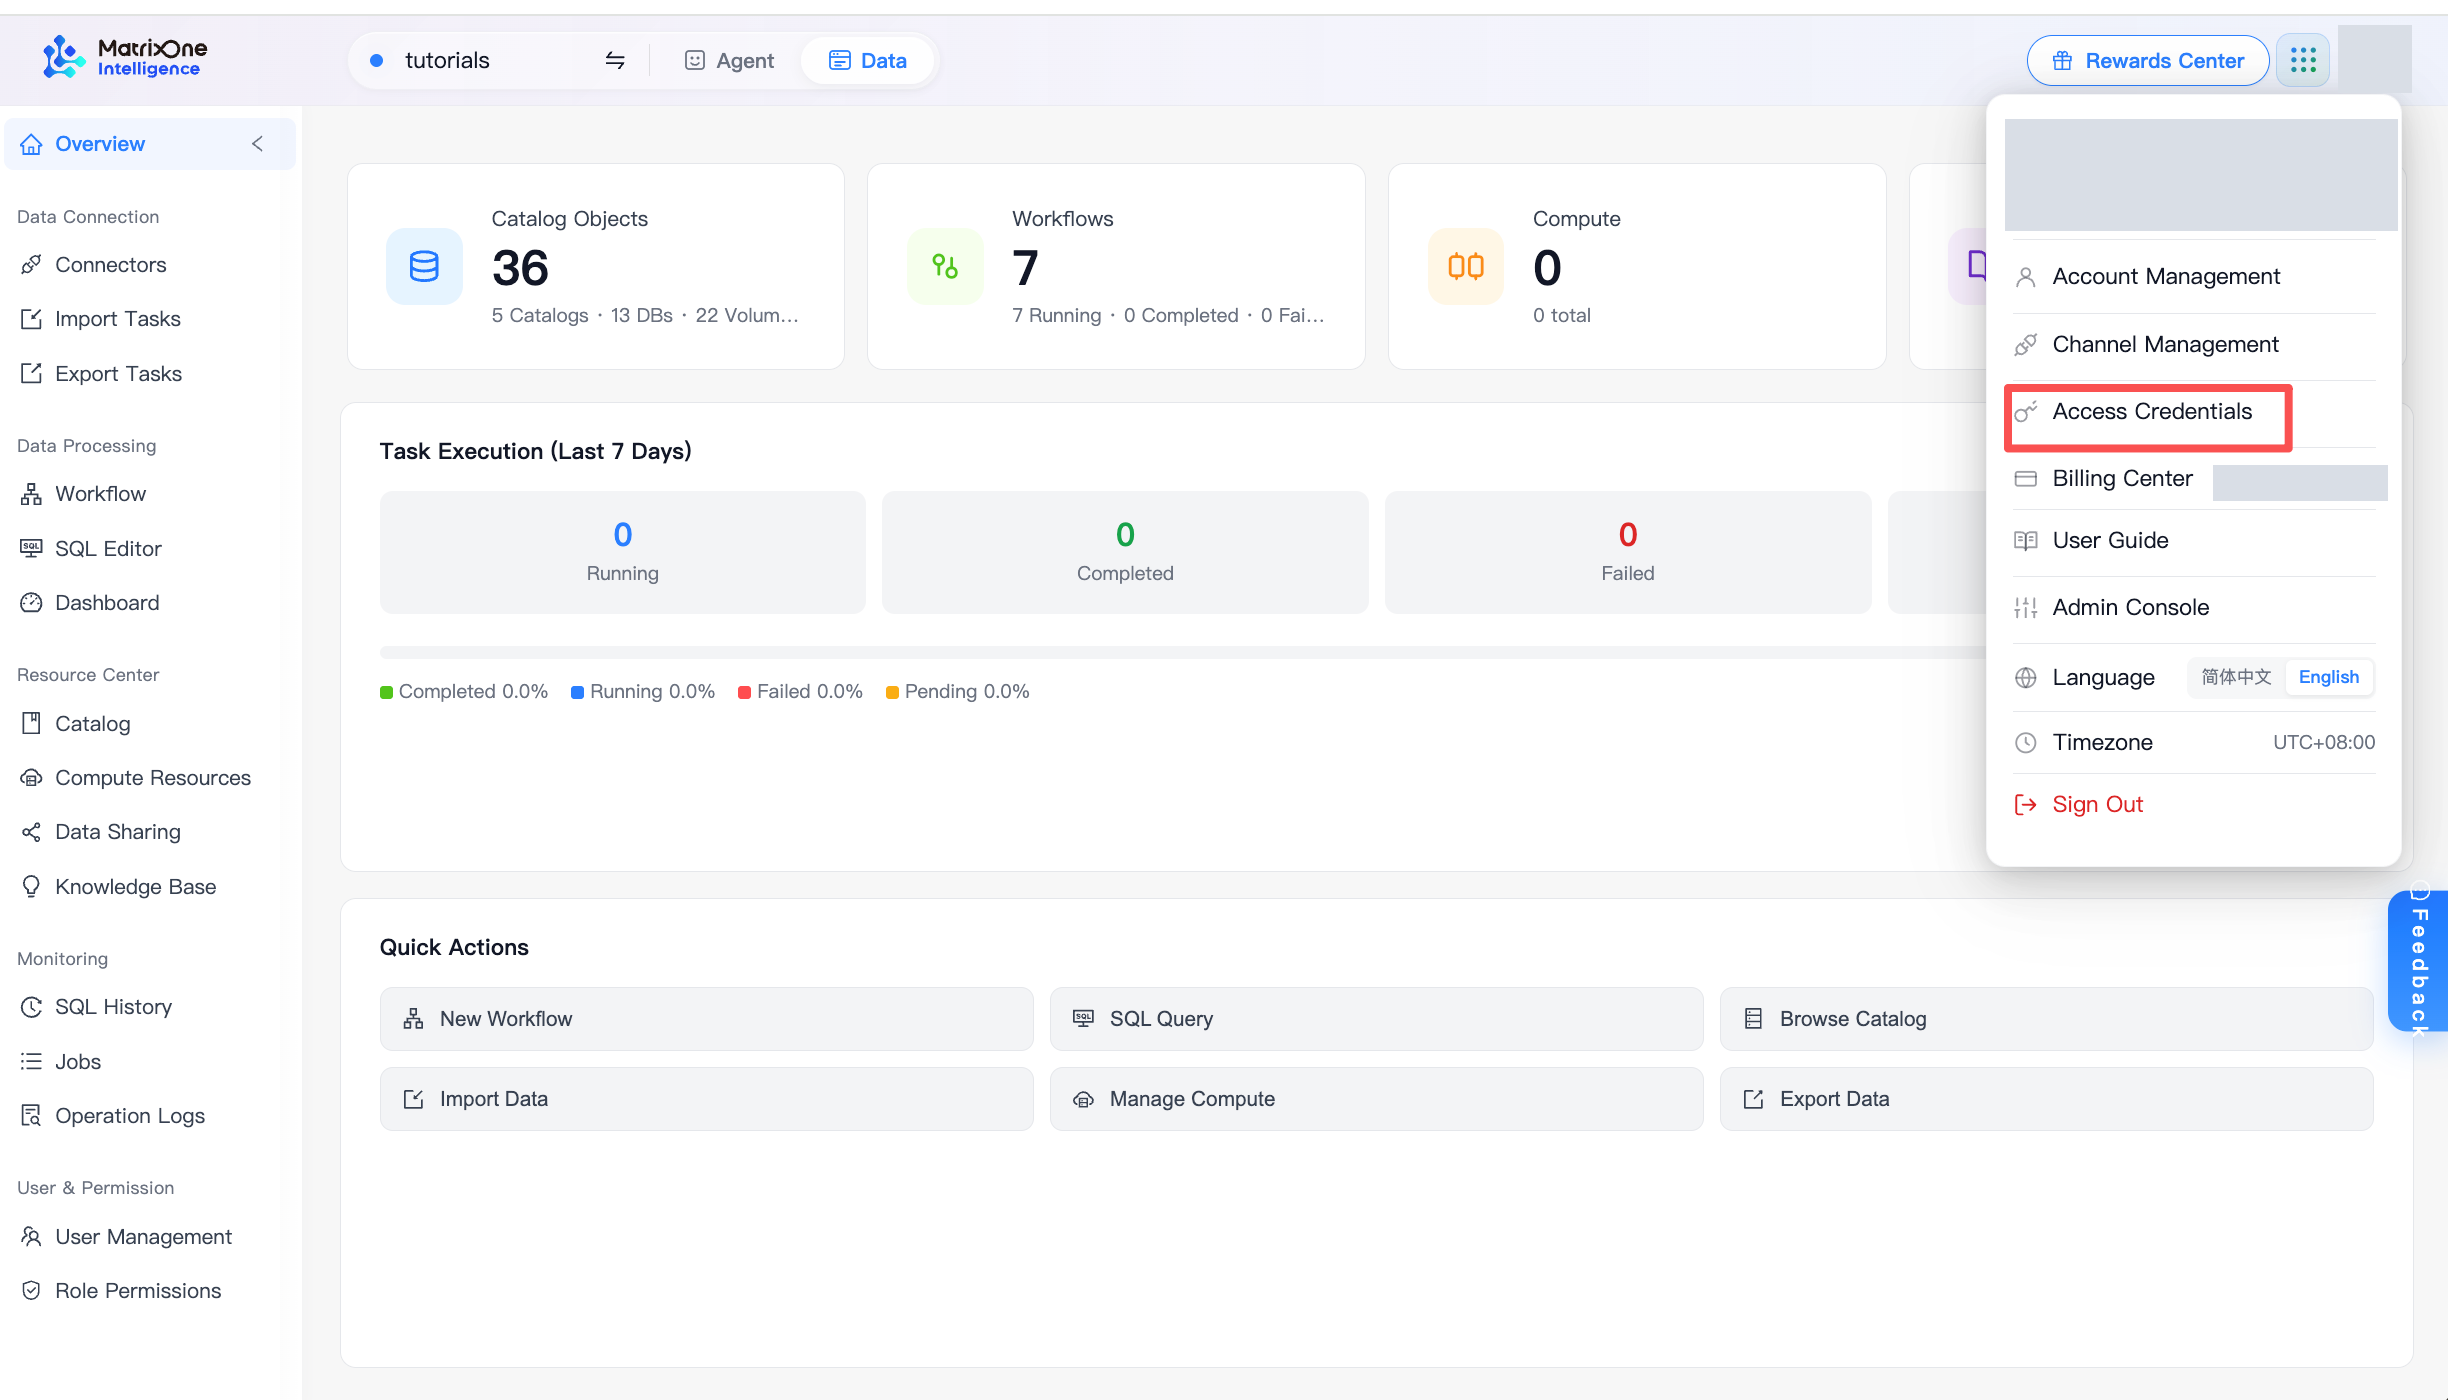
Select Personal access tokens and click Create token. You can name it
genesis-codex. Choose an expiration period and create it.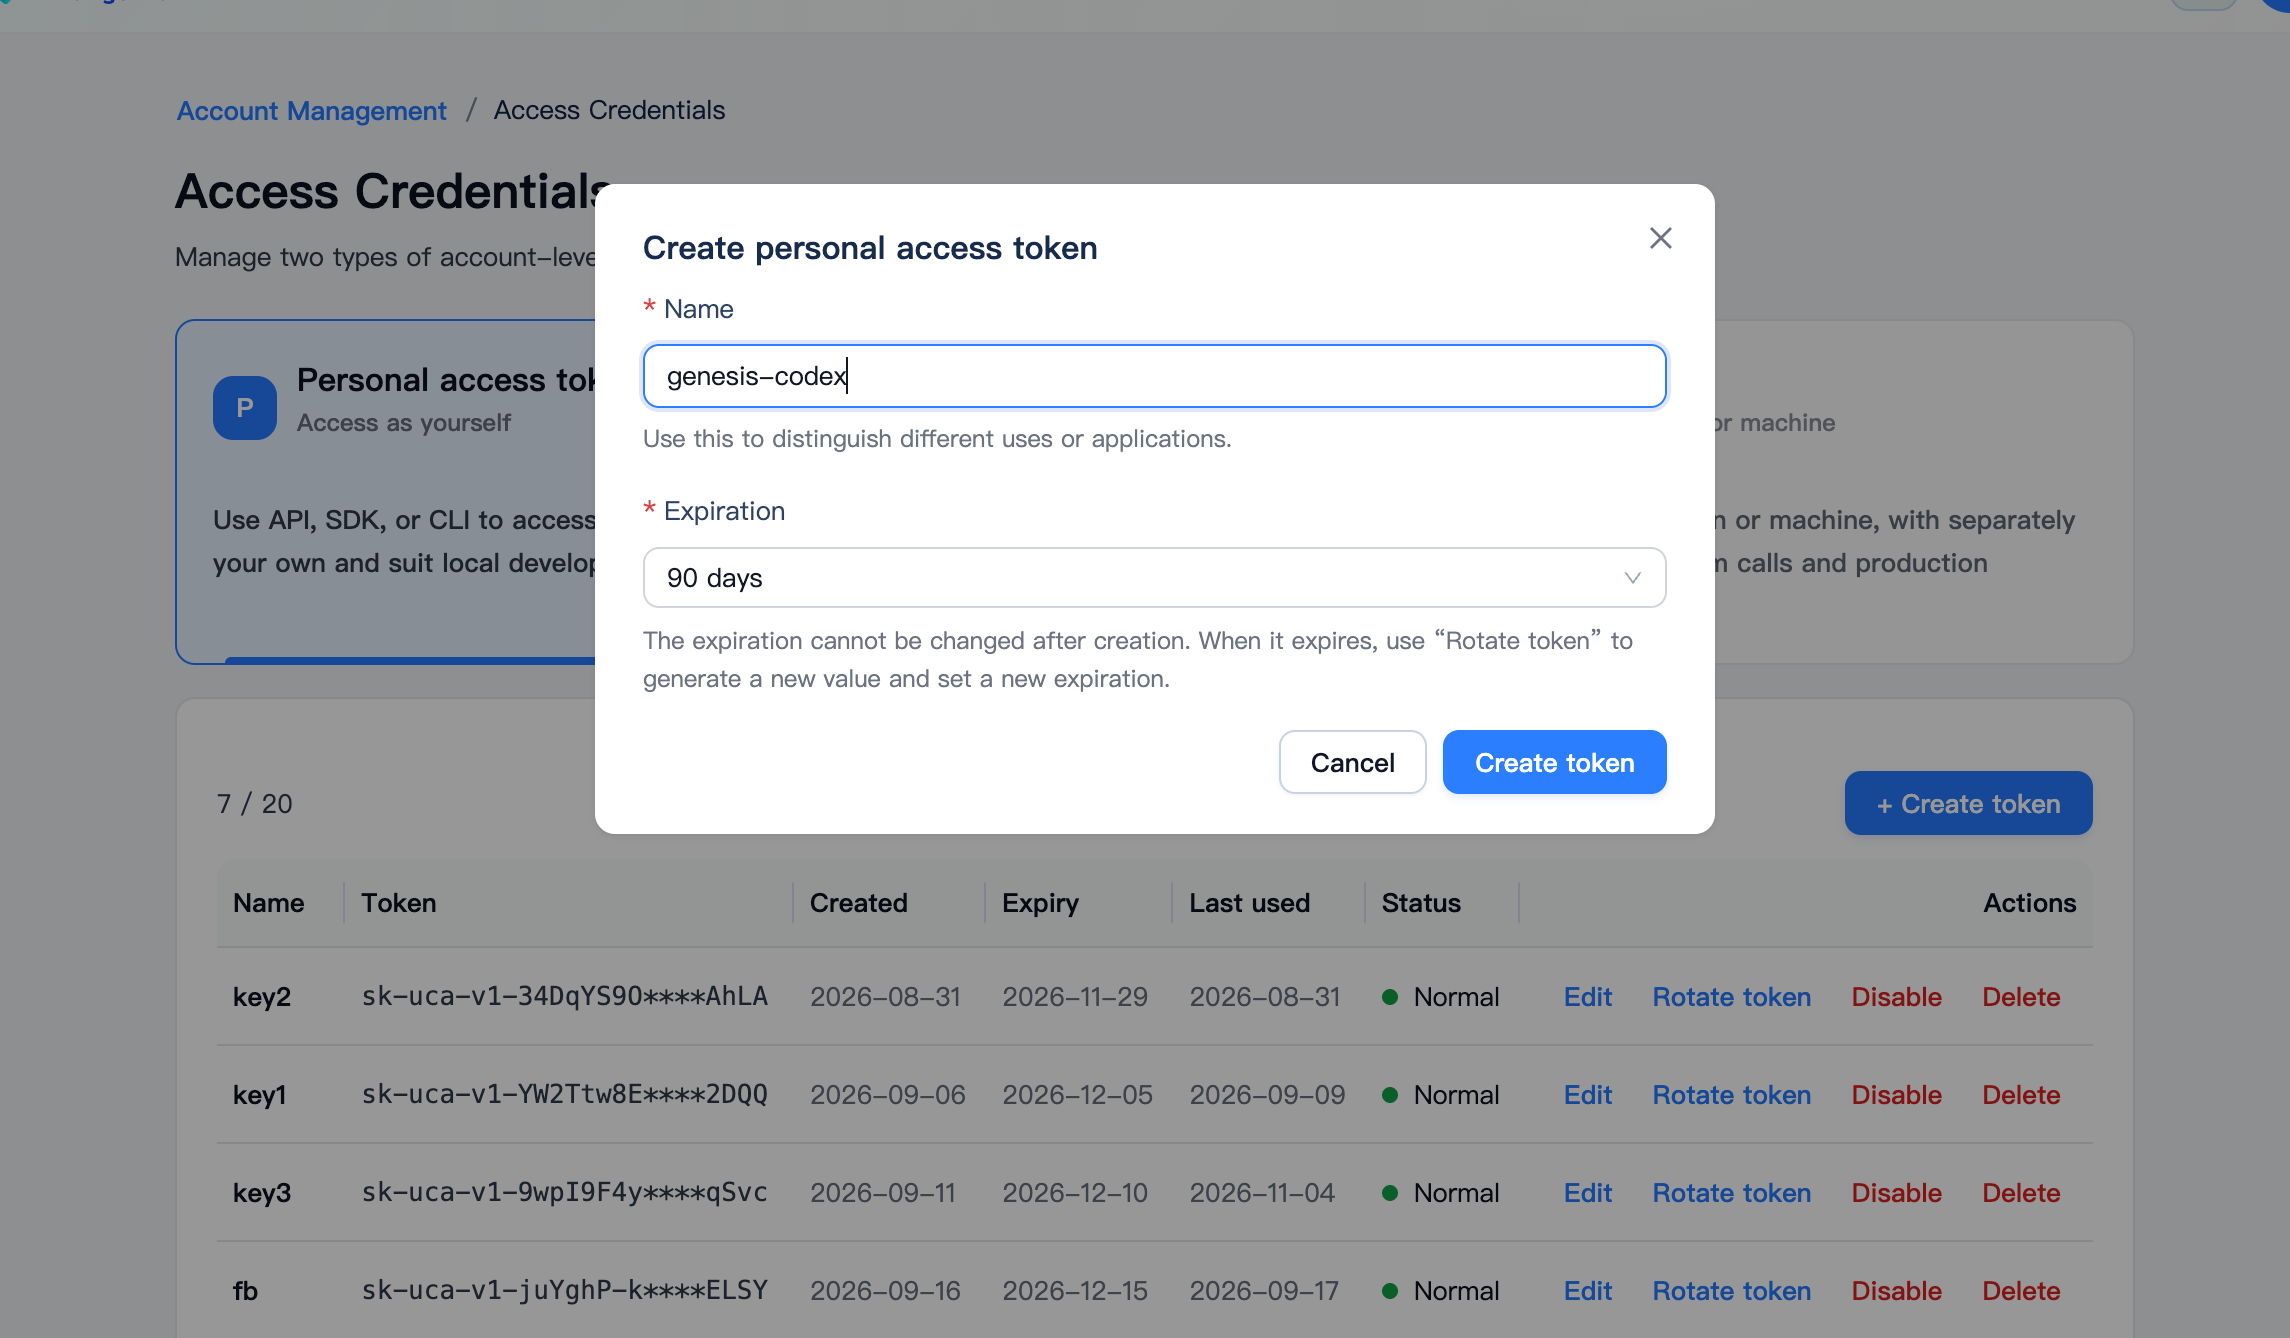
Copy and save the full token. This is the API key you will use.
2. Confirm the model and connection details in Genesis
In Genesis, open Models on the left, find
glm-5.3, and open its details.Confirm that Capabilities includes Responses and note model ID
glm-5.3.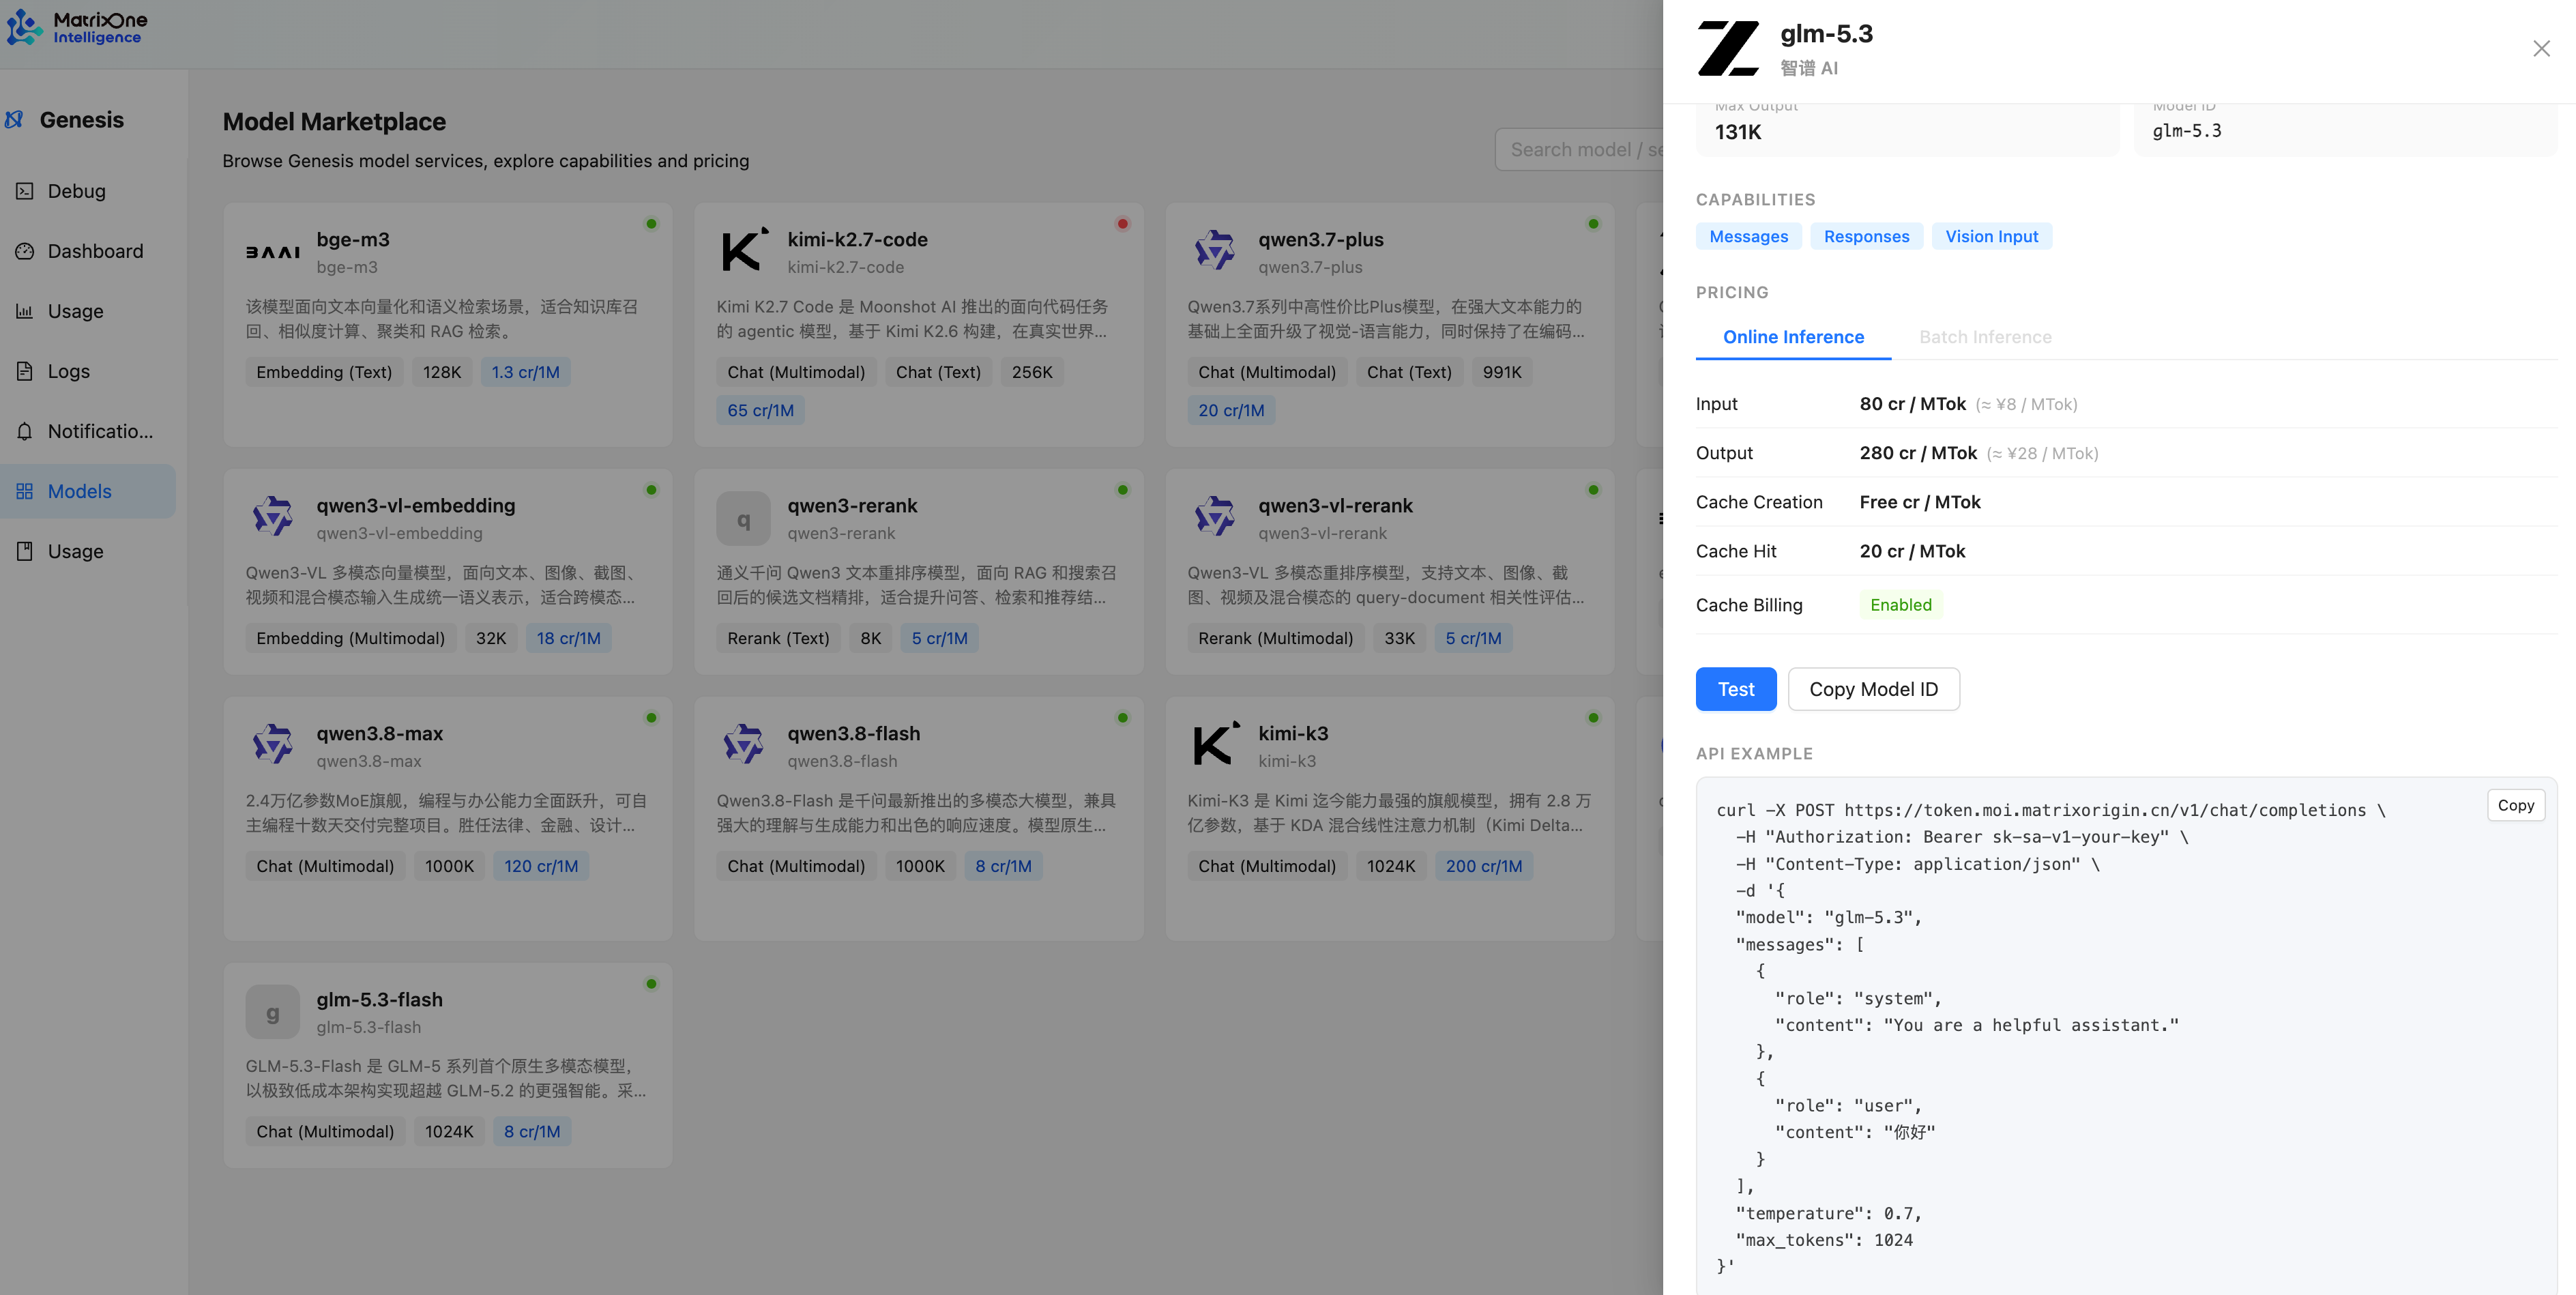
Open Usage on the left and check the Base URL under Connection information. This example uses
https://token.moi.matrixorigin.cn/v1, with Responses endpointhttps://token.moi.matrixorigin.cn/v1/responses.
3. Choose a setup method
Choose either method. Method 1 lets you copy the setup request to Codex. Method 2 is for macOS users who prefer to write the configuration directly from Terminal.
Method 1: Configure it through a Codex App conversation
Click the copy button in the upper-right corner of the block below and paste it into a new conversation in Codex App. Replace YOUR_API_KEY with your full key before sending. Replace the Base URL too if you use another environment.
Persistently connect the Genesis glm-5.3 model to this Codex App.
Goal: after restarting the app and starting a new conversation, I can select it in the model picker for conversations and code tasks.

Connection details:
- Provider name: Genesis
- Model ID: glm-5.3
- Base URL: https://token.moi.matrixorigin.cn/v1
- API: Responses API, wire_api = "responses"
- API key: YOUR_API_KEY

Please complete these steps:
1. Check the installed Codex version and existing settings. Back up configuration files before changing them.
2. Verify Responses streaming, follow-up turns, and tool calls using medium reasoning. Set both the catalog default reasoning level and model_reasoning_effort to medium.
3. Configure a Genesis provider and matching glm-5.3 catalog metadata using mechanisms supported by this version, so the model can appear in the picker.
4. Check how to preserve access to my existing models. Do not route all existing model names to Genesis. If this version requires switching providers or configurations, explain the actual steps.
5. Store credentials using a supported local mechanism that also works when the app launches from the desktop. Do not write the key into project files or repeat it in your reply.
6. After validating the configuration, report the changed files, restart steps, how to select Genesis / glm-5.3, and how to switch back to my original provider.

If the endpoint or client is incompatible, stop and explain the specific reason. Do not substitute a one-time curl call for model integration or claim that unverified steps have succeeded.
When Codex requests permission to change local settings, check the files and backup location before allowing it. A custom model catalog can replace the bundled catalog, so Codex must check how this version switches providers. Adding a name to a list alone does not complete the integration. See the official model catalog guidance.
After setup, Codex explains the changed files, backup location, and restart steps. The following is an example setup result. The provider switching script shown was generated during that setup; use the actual name and location in your own result.
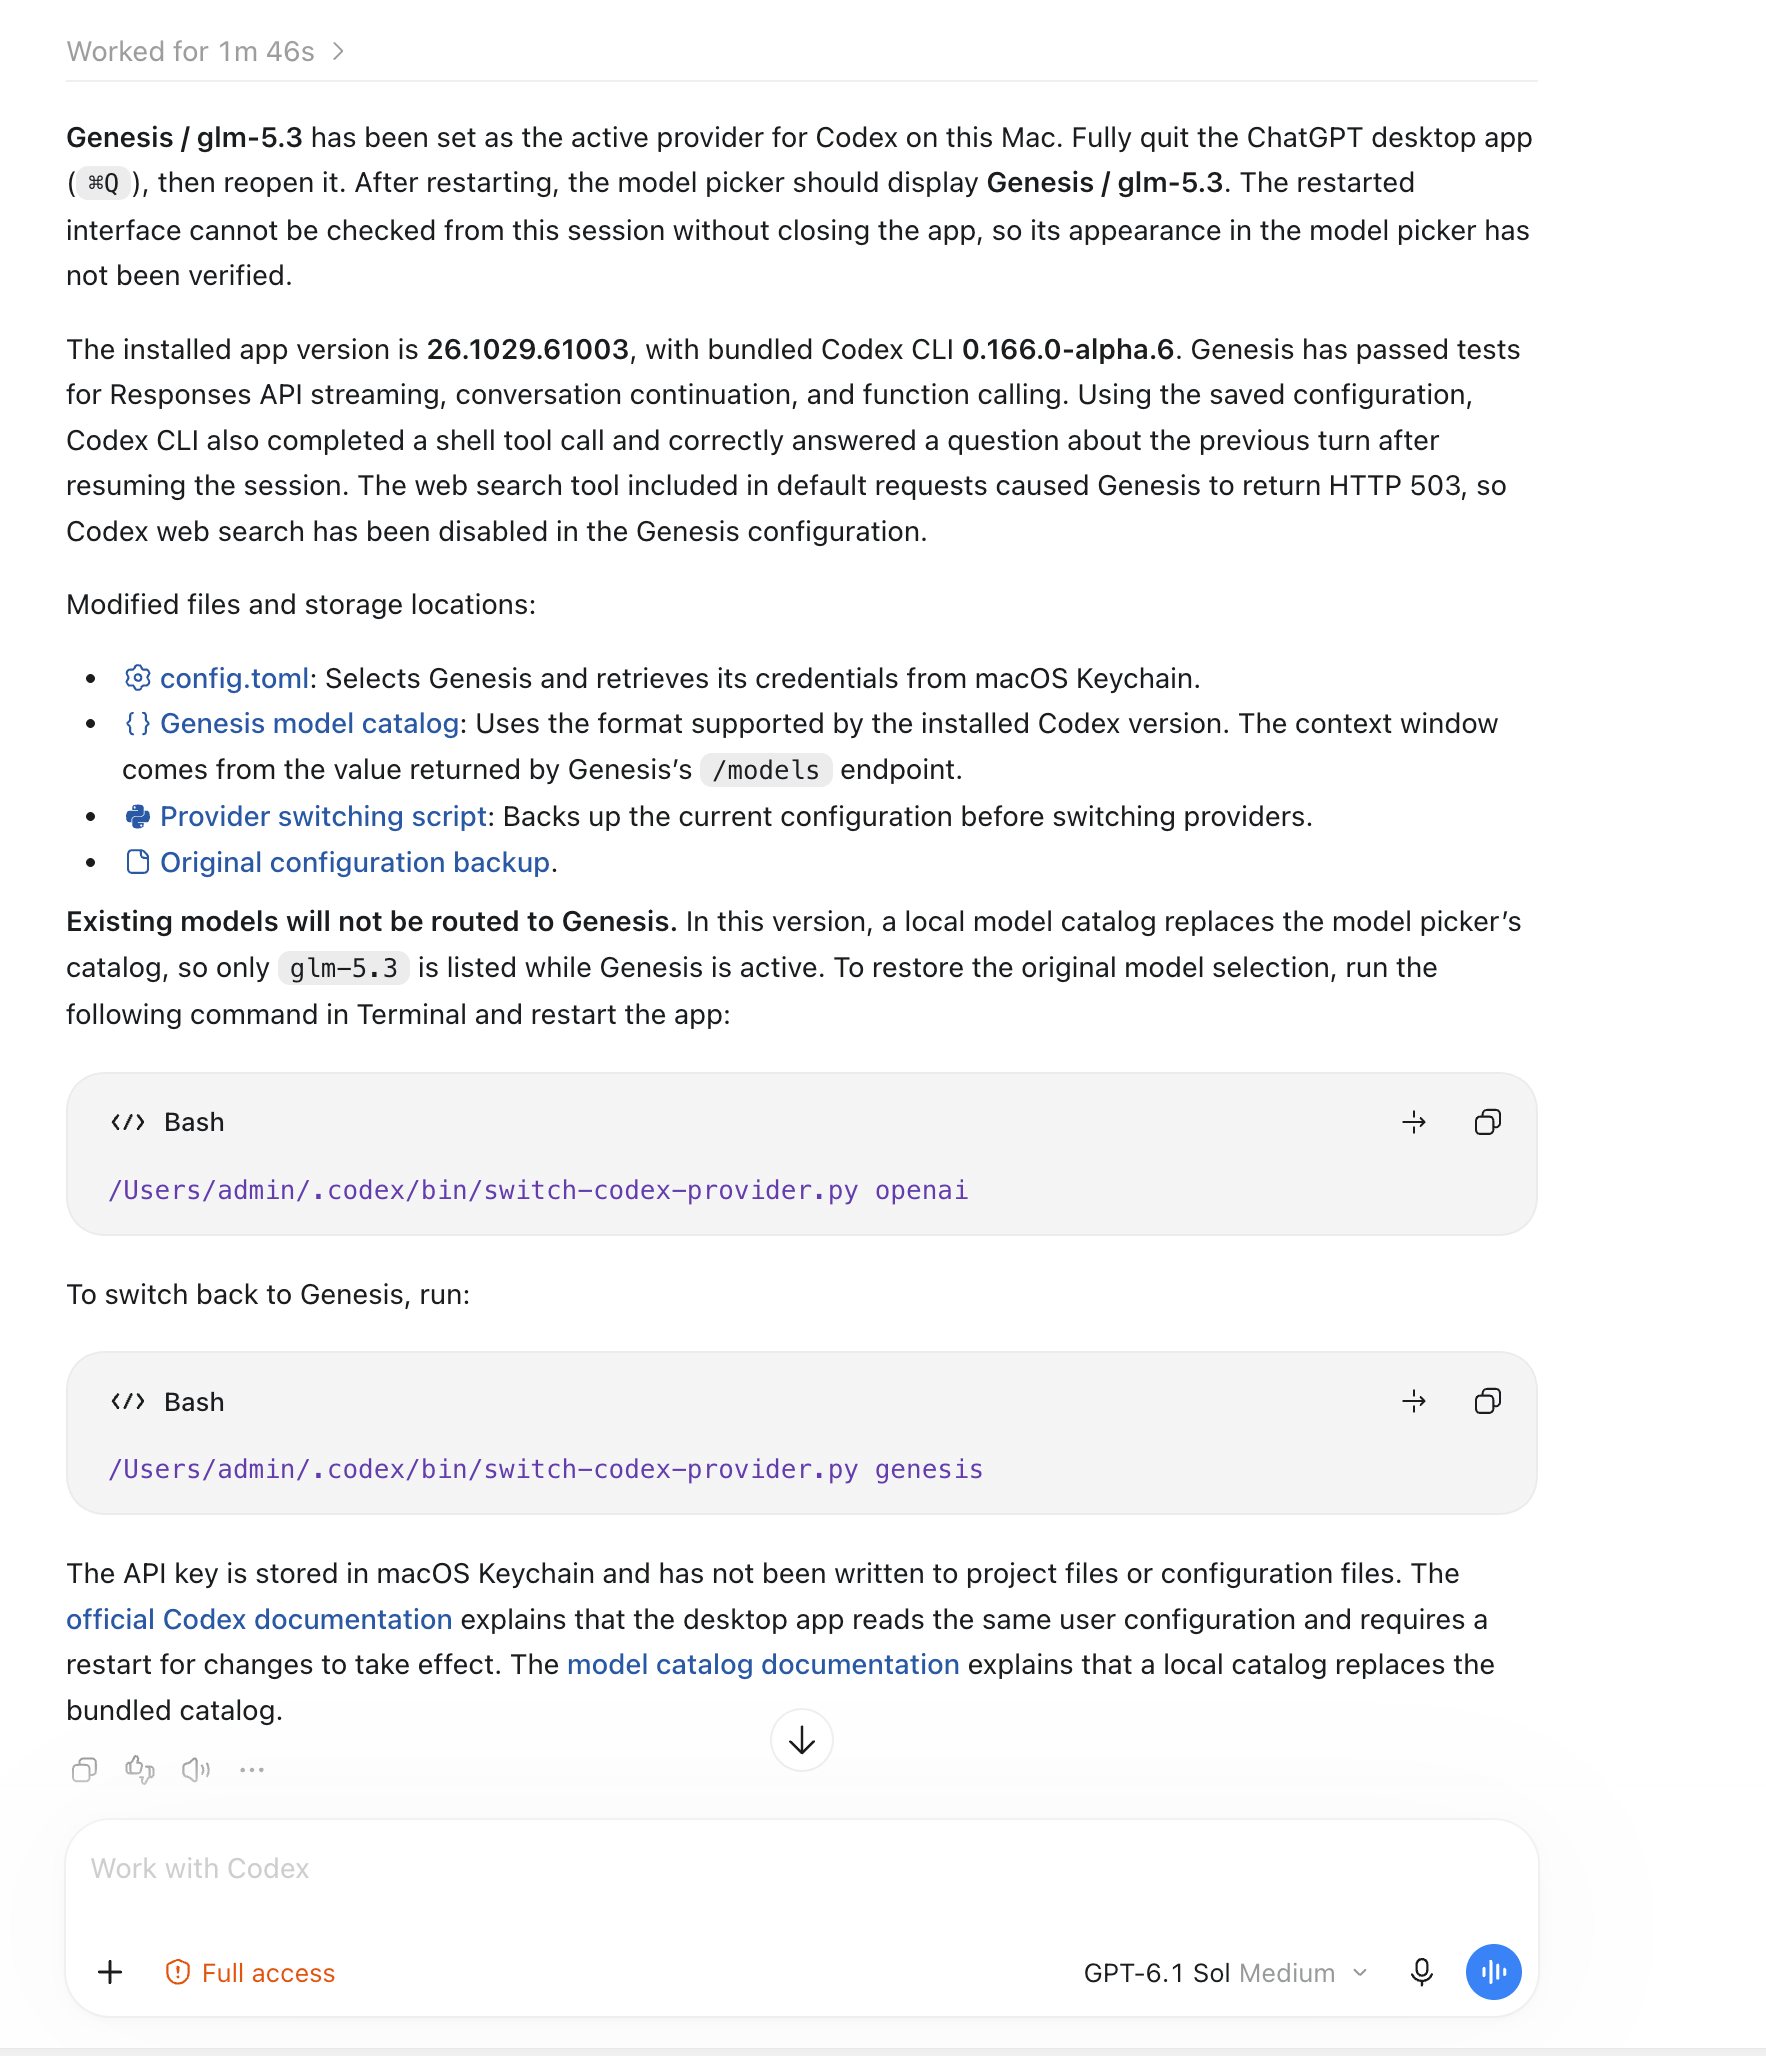
Method 2: Write the configuration from Terminal
This example switches the active provider to Genesis and lists Genesis / glm-5.3 in the catalog. It does not automatically combine models from different providers in one list. Restore your configuration backup to return to the previous provider.
1. Save your original model configuration. Run the entire block below in Terminal. It saves your original settings as config.original.toml and keeps that backup when you repeat the command. If there is no existing configuration, it creates an empty backup so switching back restores the default settings.
mkdir -p "$HOME/.codex"
if [ ! -f "$HOME/.codex/config.original.toml" ]; then
  if [ -f "$HOME/.codex/config.toml" ]; then
    cp "$HOME/.codex/config.toml" "$HOME/.codex/config.original.toml"
  else
    touch "$HOME/.codex/config.original.toml"
  fi
fi
2. Save the model catalog. Download the glm-5.3 model catalog and place it at ~/.codex/genesis-models.json. In Finder, press ⌘⇧G and enter ~/.codex to open that folder.
This catalog uses medium reasoning. Keep model_reasoning_effort = "medium" in the configuration too. In this setup, using none produces no answer text. The catalog uses text input and a conservative 32K context limit. If another version cannot read it, use method 1 to adapt it.
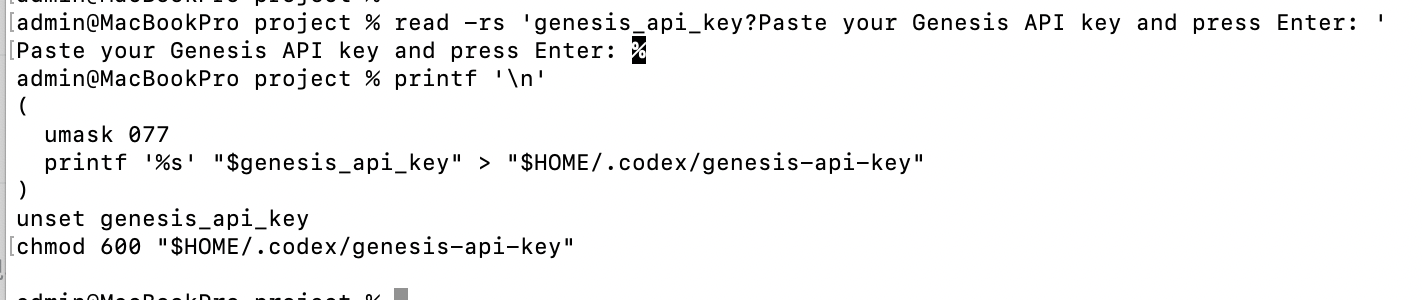
3. Save your key. Complete the following three actions in order in the default macOS zsh terminal.
read -rs 'genesis_api_key?Paste your Genesis API key and press Enter: '
When the prompt appears, copy your full key, return to Terminal, press ⌘V, and then press Enter. Paste the key where the terminal is waiting for input, not into the command itself. No characters will appear while you enter it; this is normal.
After entering the key, copy and run the following commands in the same terminal window to save it:
printf '\n'
(
  umask 077
  printf '%s' "$genesis_api_key" > "$HOME/.codex/genesis-api-key"
)
unset genesis_api_key
chmod 600 "$HOME/.codex/genesis-api-key"
4. Write the configuration. Copy the entire command below into Terminal and run it unchanged. $HOME expands to your home directory, so you do not need to change a username or open an editor.
After completing step 1, run the following command. It writes the active configuration and saves a copy as config.genesis.toml for switching later.
cat > "$HOME/.codex/config.toml" <<EOF
model = "glm-5.3"
model_provider = "genesis"
model_reasoning_effort = "medium"
model_catalog_json = "$HOME/.codex/genesis-models.json"
web_search = "disabled"

[model_providers.genesis]
name = "Genesis"
base_url = "https://token.moi.matrixorigin.cn/v1"
wire_api = "responses"

[model_providers.genesis.auth]
command = "/bin/cat"
args = ["$HOME/.codex/genesis-api-key"]
EOF
cp "$HOME/.codex/config.toml" "$HOME/.codex/config.genesis.toml"
When the command finishes, the configuration is saved at ~/.codex/config.toml. Continue with section 4 to restart Codex App and start a new conversation.
View your configuration files. Run this in Terminal:
ls -l "$HOME/.codex/"config*.toml
This setup uses three files:
File |
Purpose |
|---|---|
|
The configuration currently used by the app |
|
Your original model configuration saved in step 1 |
|
The Genesis configuration you just saved |
Switch back to your original models. Fully quit Codex App, then copy and run:
cp "$HOME/.codex/config.original.toml" "$HOME/.codex/config.toml"
Switch to Genesis again. Fully quit Codex App, then copy and run:
cp "$HOME/.codex/config.genesis.toml" "$HOME/.codex/config.toml"
After either switch, reopen Codex App and start a new conversation. Both saved configurations remain available, so you do not need to find a dated backup or rename files.
4. Restart Codex App and select the model in a new conversation
This tutorial switches the model provider in Codex App. After switching, fully quit and restart Codex App, then start a new conversation in the app to use the new model configuration. Existing app conversations retain their previous configuration and cannot switch directly to the newly configured Genesis model.
After completing your chosen setup method, fully quit and reopen the app. On macOS, use
⌘Qto quit.Click New conversation and open the model picker below the input box. Confirm that you can find and select
Genesis / glm-5.3. If your version requires a provider switch first, follow the configuration result’s instructions.Send “What model are you?” in the new conversation and read the reply.
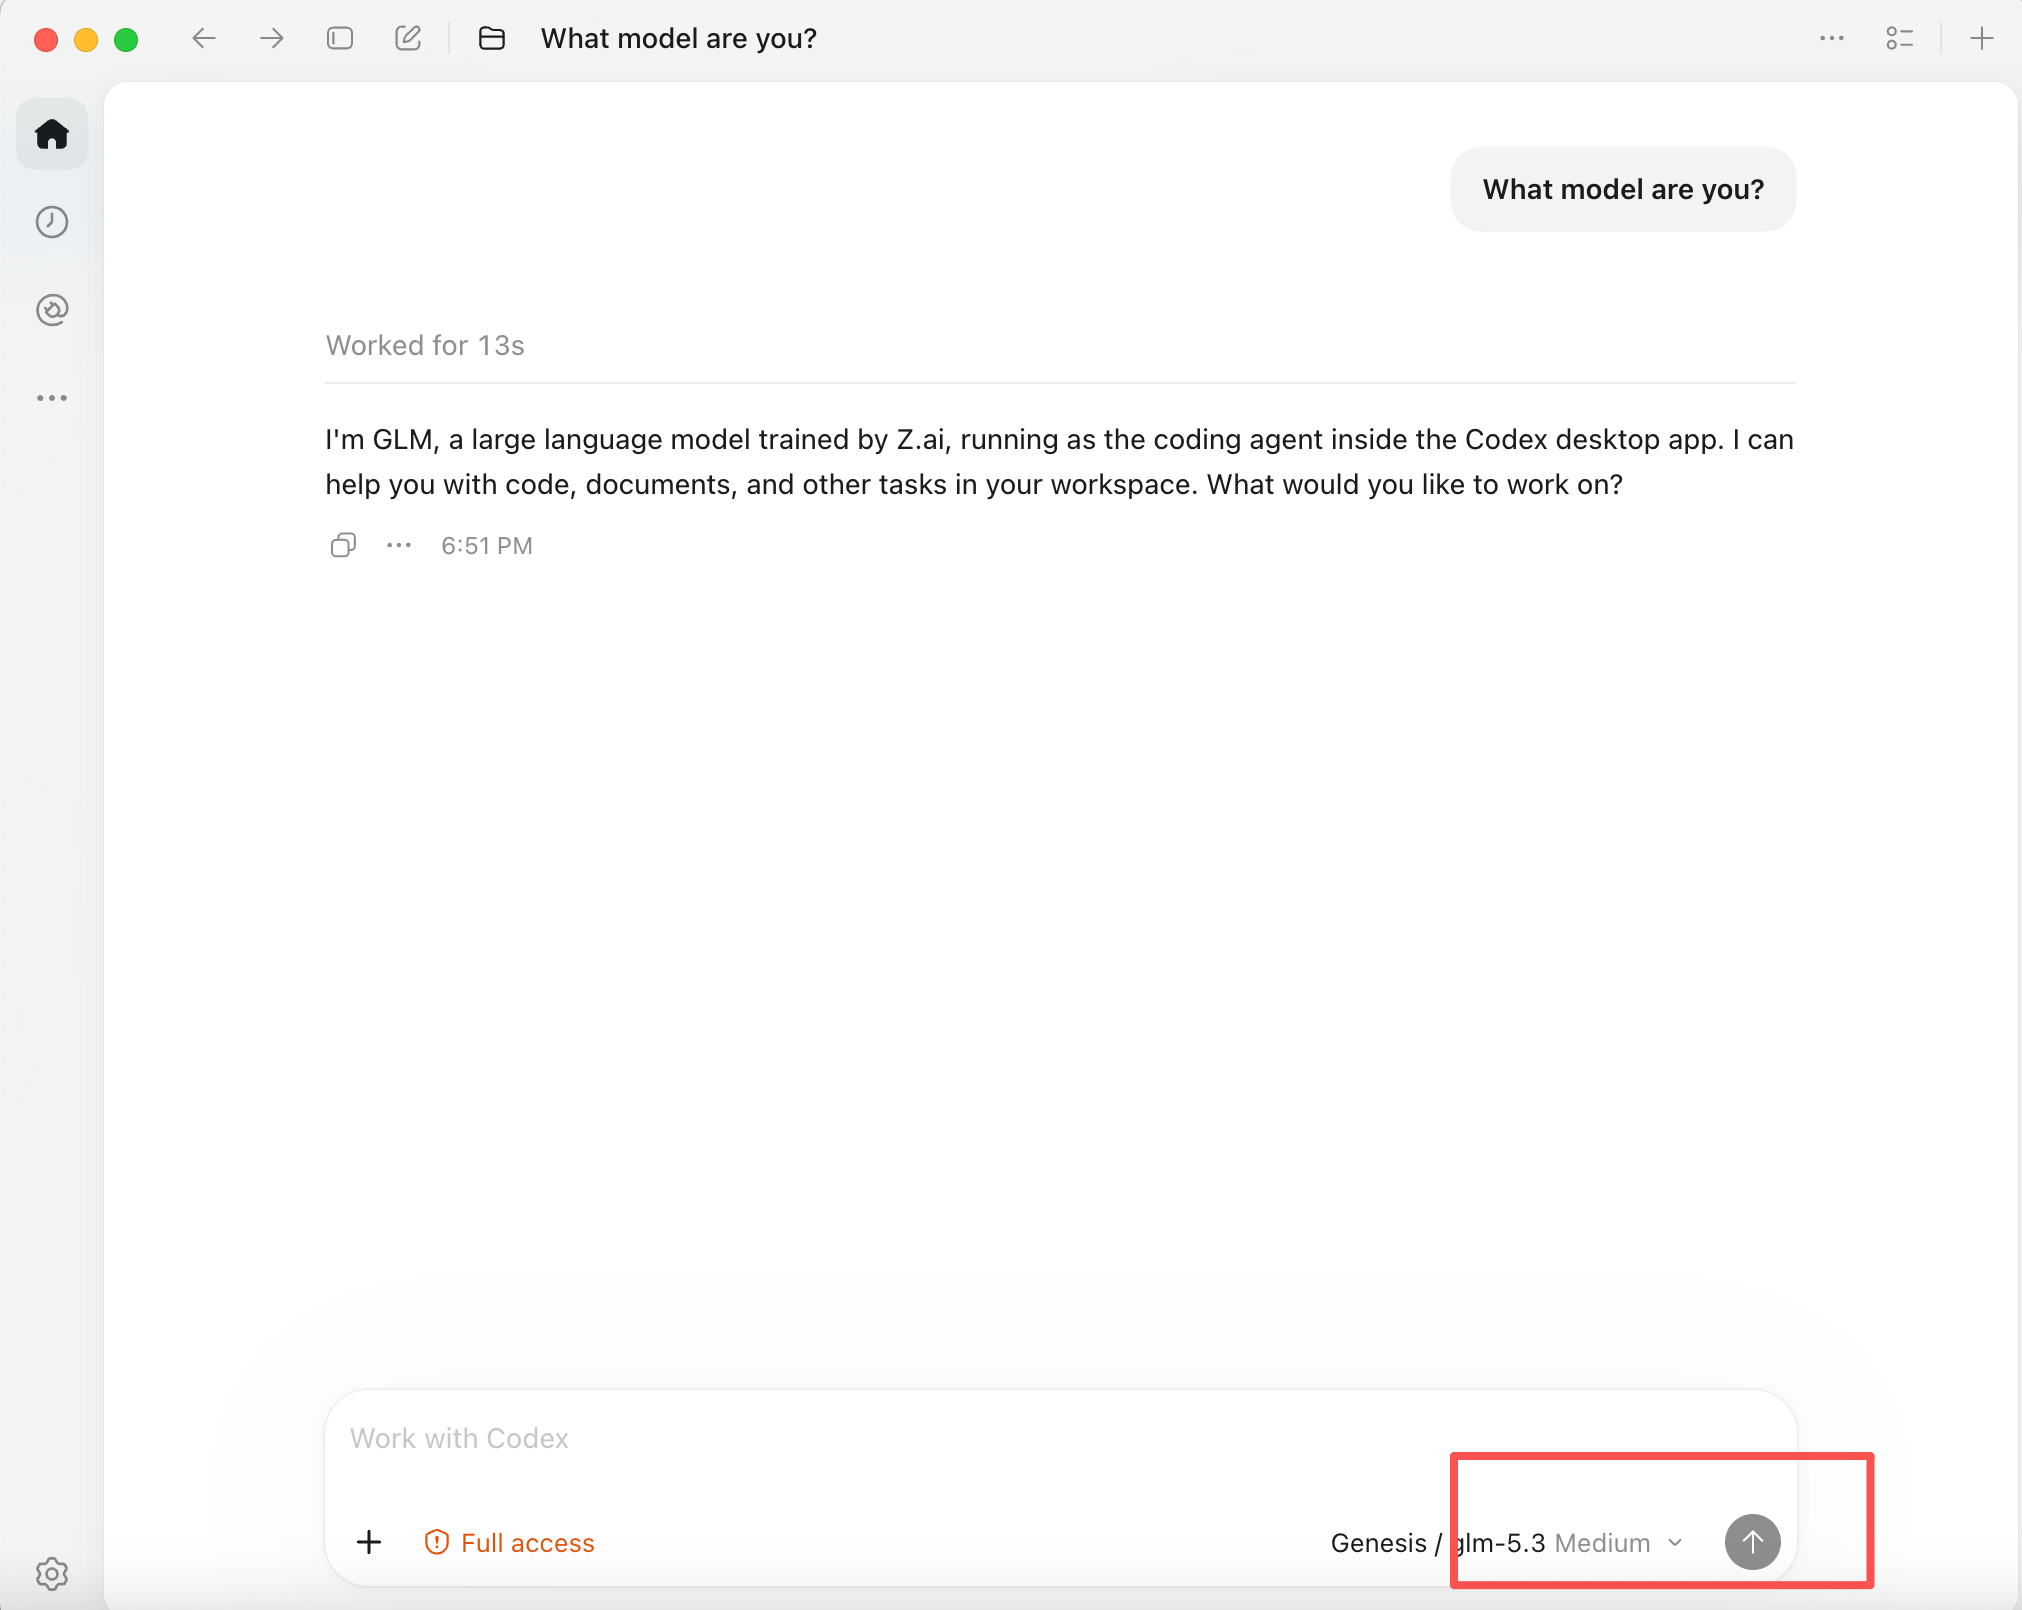
As shown above, the model picker displays Genesis / glm-5.3 and the new conversation receives a reply. You have now completed the model switch in Codex App.